Table of Contents
Technical
Automating Your Closed Caption Workflows Part 1
Getting Started with Closed Caption Converter
By: Tim Taylor
Last Updated: September 16, 2025
This is the first of a three-part series on using the Closed Caption Converter (CCC) programmatically without relying on its web interface. We'll show you how to create clean, efficient JSON profiles for both CLI (Command-Line Interface) and API job submissions.
TLDR:
- Clean JSON profiles are more maintainable and debuggable than auto-generated ones
- CLI is perfect for local testing and offline workflows
- API enables scalable, cloud-based caption processing
- Start with minimal templates and add only the filters you need
- Always test locally before deploying to production workflows
Ready to streamline your caption conversion process? Start with the template below and customize it for your specific use cases.
Why This Matters for Developers
If you're building automated caption workflows or need to batch-process subtitle files, you've likely encountered the Closed Caption Converter's web GUI. While functional, the web interface generates verbose JSON profiles filled with unnecessary default filters that can make your configurations hard to read, maintain, and debug.
This guide is essential for developers who want to:
- Create automated caption conversion workflows
- Perform rapid testing and debugging of caption jobs
- Build clean, maintainable configuration files
- Integrate caption conversion into existing pipelines
Understanding Closed Caption Converter
Closed Caption Converter is a powerful tool for converting and conforming caption and subtitle files between different formats (SCC, WebVTT, SRT, etc.). While most users interact with it through the web GUI, it offers both CLI and API interfaces that are perfect for automation.
Key advantages of CLI/API approach:
- CLI: Completely self-contained, no internet connection required, perfect for local testing and debugging
- API: Ideal for cloud-based workflows and integration with existing services
- Both: Enable clean, version-controlled configuration management
The Problem with Auto-Generated JSON
When you use the CCC web GUI to create a job profile, it generates JSON packed with every possible filter and setting, even ones that aren't relevant to your specific conversion. Here's what a typical auto-generated profile looks like - verbose and cluttered with defaults you don't need.
The solution? Build your own lean profiles from scratch.
Creating a Clean JSON Template
Let's start with a minimal, human-readable template that you can customize for specific jobs:
{
  "source_frameRate": 29.97,
  "target_frameRate": 29.97,
  "incode": "auto",
  "automatic_offset": true,
  "segments": [],
  "encoding_options": [
    {"name": "Encode Position", "selected": true},
    {"name": "Encode Formatting", "selected": true},
    {"name": "Encode Font Styles", "selected": false}
  ],
  "source_profile": "Add-profile-here",
  "target_profile": "Add-profile-here",
  "source": "sourceCap-Sub_file.scc",
  "target": "convertedSub-Cap_file.vtt"
}
Template Breakdown
Frame Rate Settings:
source_frameRate/target_frameRate: Match these to your source video's frame rate (23.976, 24, 29.97, 30, etc.)
Timing Controls:
automatic_offset: true: Automatically converts source timecode to output starting at zero hoursincode: "auto": Automatically starts captions at zero time (works with automatic_offset)
Encoding Options:
Encode Position: Preserves positioning information from sourceEncode Formatting: Maintains text formatting (bold, italic, etc.)Encode Font Styles: Controls whether font styling is preserved (often disabled for web formats)
Profiles:
source_profile: Format of input file ("scenerist" for SCC, "webVtt" for VTT, etc.)target_profile: Desired output format
Real-World Example: SCC to WebVTT Conversion
Let's walk through converting an SCC file (commonly used in broadcast) to WebVTT (web standard) with segment timing.
Scenario
- Source: SCC file at 29.97fps
- Target: WebVTT at 29.97fps (no frame rate conversion needed)
- Segments: 2 video segments with a 5-second break between them
Segment Information
From the video manifest, we have:
- Segment 1: 01:00:00;00 to 01:08:15;11 (duration: 00:08:15;11)
- Break: 5 seconds of commercial black
- Segment 2: 01:08:20;11 to 01:13:34;03 (duration: 00:05:13;24)
Complete JSON Configuration
{
  "source_frameRate": 29.97,
  "target_frameRate": 29.97,
  "incode": "auto",
  "automatic_offset": true,
  "segments": [
    {
      "duration": "00:08:15;11",
      "endTime": "01:08:15;11",
      "source": "file",
      "startTime": "01:00:00;00"
    },
    {
      "duration": "00:00:00;05",
      "endTime": "00:00:00;05",
      "source": "black",
      "startTime": "00:00:00;01"
    },
    {
      "duration": "00:05:13;24",
      "endTime": "01:13:34;03",
      "source": "file",
      "startTime": "01:08:20;11"
    }
  ],
  "encoding_options": [
    {"name": "Encode Position", "selected": true},
    {"name": "Encode Formatting", "selected": true},
    {"name": "Encode Font Styles", "selected": false}
  ],
  "source_profile": "scenerist",
  "target_profile": "webVtt",
  "source": "TimSource.scc",
  "target": "TimTarget.vtt"
}
CLI Implementation
Save your JSON as cli_test_preset.json and run the conversion:
C:\Users\username\ccconvert\ccconverter.exe --config cli_test_preset.json
Success indicators:
- No output = successful conversion
- Error message = check your JSON syntax and file paths
- Target file appears in your working directory
Pro tip: Always verify your file paths are correct for both the CLI executable and your caption assets.
API Implementation
For API usage, we need to modify our JSON slightly by removing the file references:
{
  "source_frameRate": 29.97,
  "target_frameRate": 29.97,
  "incode": "auto",
  "automatic_offset": true,
  "segments": [
    {
      "duration": "00:08:15;11",
      "endTime": "01:08:15;11",
      "source": "file",
      "startTime": "01:00:00;00"
    },
    {
      "duration": "00:00:00;05",
      "endTime": "00:00:00;05",
      "source": "black",
      "startTime": "00:00:00;00"
    },
    {
      "duration": "00:05:13;24",
      "endTime": "01:13:34;03",
      "source": "file",
      "startTime": "01:08:20;11"
    }
  ],
  "encoding_options": [
    {"name": "Encode Position", "selected": true},
    {"name": "Encode Formatting", "selected": true},
    {"name": "Encode Font Styles", "selected": false}
  ],
  "source_profile": "scenerist",
  "target_profile": "webVtt"
}
API Workflow with Postman
The API requires three components:
- Authorization Key: Obtain from the CCC web GUI
- Source File: Your caption/subtitle file
- JSON Configuration: The profile we just created
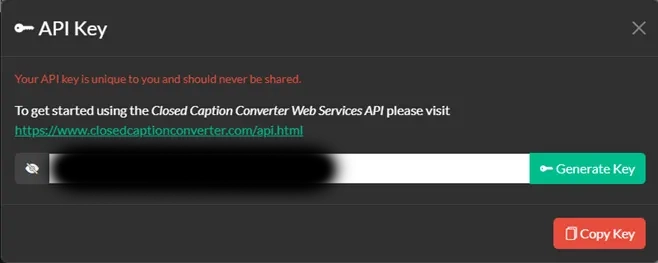
Postman Setup:
- Auth Type: API Key
- Key: Copy from CCC web GUI (format: 1234567-8901234-5678901-2345678)
Body (form-data):
- Key: source → Value: Select your source caption file
- Key: config → Value: Paste your JSON configuration
Click SEND. On success, you'll receive a download URL for your converted file.
Best Practices and Next Steps
Configuration Management
- Store your JSON profiles in version control
- Create templates for common conversion scenarios
- Document any non-standard settings for team members
Error Handling
- Always test configurations with the CLI first (faster debugging)
- Validate JSON syntax before API calls
- Keep file paths relative when possible
Future-Proofing
If you rely on specific Closed Caption Converter default behaviors, consider explicitly defining them in your JSON profiles. This protects against potential default value changes in future Converter releases.
What's Next
This foundation sets you up for more advanced caption workflow automation. In our next article, we'll dive deep into creating frame-accurate segment timings for CLI and API jobs, including how to extract timing information from video manifests and handle complex segmentation scenarios.
Following that, we'll explore advanced Postman techniques for CCC API integration, including batch processing and error handling strategies.