Plaintext Import
The Plaintext Import feature transforms raw transcript text into properly formatted Events, making it the ideal starting point for subtitle and transcription workflows. Whether you're working with a vendor-provided transcript, cleaning up manual transcription, or converting documentation into captioned content, this tool intelligently processes your text files while giving you complete control over how the content is structured. You can access Plaintext Import by navigating to File → Import → Plaintext (Transcript) from the main menu.
The feature provides an intelligent text processing engine that understands punctuation patterns, respects paragraph structures, and automatically wraps text to meet your specification requirements. What sets this tool apart is its real-time preview system that shows you exactly how your transcript will be formatted before you commit to the import, allowing you to fine-tune settings until the output matches your needs perfectly.
Supported Formats
Plaintext Import supports two primary file formats to accommodate different workflow requirements. Standard TXT files are the most common format, providing straightforward plain text input that can be processed with full control over character encoding. The encoding selector allows you to choose from multiple character encodings beyond the UTF-8 default, which is particularly important when working with international content containing accented characters (French, Spanish, German), Cyrillic scripts (Russian, Ukrainian), Arabic, Chinese, Japanese, or other non-Latin writing systems. Selecting the correct encoding ensures that special characters display properly rather than appearing as garbled symbols.
For users working with formatted documents, the import tool also supports DOCX files (Microsoft Word documents). When you select a DOCX file, the application uses the mammoth library to extract the plain text content from the document, automatically handling the document structure and converting it into processable text. This is particularly useful when transcripts are delivered in Word format, as you can import them directly without needing to manually copy and paste or convert to plain text first.
Import Settings
The import process is controlled through several key settings that determine how your raw transcript text is transformed into structured Events. These settings work together to achieve the perfect balance between automatic formatting and manual control.
Max Lines Per Event
This setting controls how many lines of text can appear in a single Event before the system creates a new one. The default value is 1 line, which creates single-line Events suitable for many subtitle formats, but you can specify any positive integer to allow multi-line Events. For example, setting this to 2 allows each Event to contain up to two lines of text, which is common for broadcast subtitles where dual-line presentation is standard. This setting works in conjunction with the character limit to determine Event boundaries, with the system creating a new Event whenever either the line limit or character limit is reached.
Max Characters Per Line
The character limit determines when the automatic word-wrapping algorithm creates a new line within an Event. With a default of 32 characters per line, the system monitors the length of each line as it builds, checking whether adding the next word would exceed the limit. The algorithm uses intelligent word-wrapping logic that calculates line.length + word.length + 1 (the +1 accounts for the space character) to ensure words are never split mid-character. When adding the next word would exceed your specified limit, the system moves that word to a new line instead of breaking it apart, preserving readability and ensuring compliance with caption format specifications.
Event Breaking Options
The import tool includes sophisticated event-breaking logic that determines when to start a new Event based on the content itself. The End Event On Punctuation option is particularly intelligent, automatically creating a new Event after periods, question marks, exclamation points, and semicolons. However, rather than blindly breaking on every punctuation mark, the system includes smart abbreviation detection that recognizes approximately 40 common abbreviations including "Dr.", "Mr.", "Mrs.", "Inc.", "U.S.", "etc.", "i.e.", and "e.g." This prevents the creation of unwanted Event breaks in the middle of sentences like "Dr. Smith said..." or "The U.S. government announced...", ensuring that only genuine sentence endings trigger new Events.
For transcripts with specific formatting needs, you can also enable End Event On Comma to create new Events at natural pause points, which can be useful for creating shorter, more digestible subtitle segments. Additionally, the End Event On Character option allows you to specify a custom character that should trigger Event creation, while the Start Event On Character option lets you designate a character that should begin a new Event. These custom character options are particularly valuable when working with specially-formatted transcripts that use markers or symbols to indicate caption boundaries.
Timecode Stripping
Many vendor-provided transcripts include embedded timecodes within the text itself, which can interfere with the import process if not handled properly. The Ignore Timecodes option automatically detects and removes these embedded timecodes during import, supporting multiple common formats including hh:mm:ss:ff (hours:minutes:seconds:frames), hh:mm:ss (hours:minutes:seconds), hh:mm:ss:mmm (with milliseconds), and hh:mm:ss,mmm (SRT-style format with comma separators). After stripping the timecodes, the system automatically cleans up the resulting empty lines and excessive line breaks to maintain proper paragraph structure. This feature is invaluable when you need to reimport a transcript that already contains timing information, allowing you to focus on the text content while the system handles the cleanup automatically.
Event Group Options
When importing plaintext, you must decide where the resulting Events will be placed within your project structure. The import tool offers two primary approaches: creating a new Event Group or importing into an existing one.
Creating a New Event Group is the most common choice when starting a fresh project or working with a distinct piece of content. When you select this option, the system automatically names the new Event Group using the imported filename, making it easy to identify later. You'll be prompted to specify the Event Group Type (Subtitle, Transcription, or Audio Description if your license includes AD support), select the language from the comprehensive list of supported languages, and toggle the RTL (Right-to-Left) setting if you're working with Arabic, Hebrew, or other right-to-left scripts. These settings ensure that the Events are created with the appropriate defaults for alignment, formatting, and behavior.
Importing into an Existing Event Group is useful when you need to add content to work you've already started or when you're building a project incrementally. When you select an existing Event Group from the dropdown menu, you'll see an additional option to choose between Merge and Replace modes. Merge mode appends the newly imported Events to the bottom of the existing Event list, preserving all your previous work while adding the new content. Replace mode, conversely, removes all existing Events from the selected Event Group before importing the new content, effectively using the import as a replacement operation. This is useful when you need to reimport a corrected transcript or start over with new content while maintaining the Event Group's other settings like language, type, and formatting preferences.
Preview System
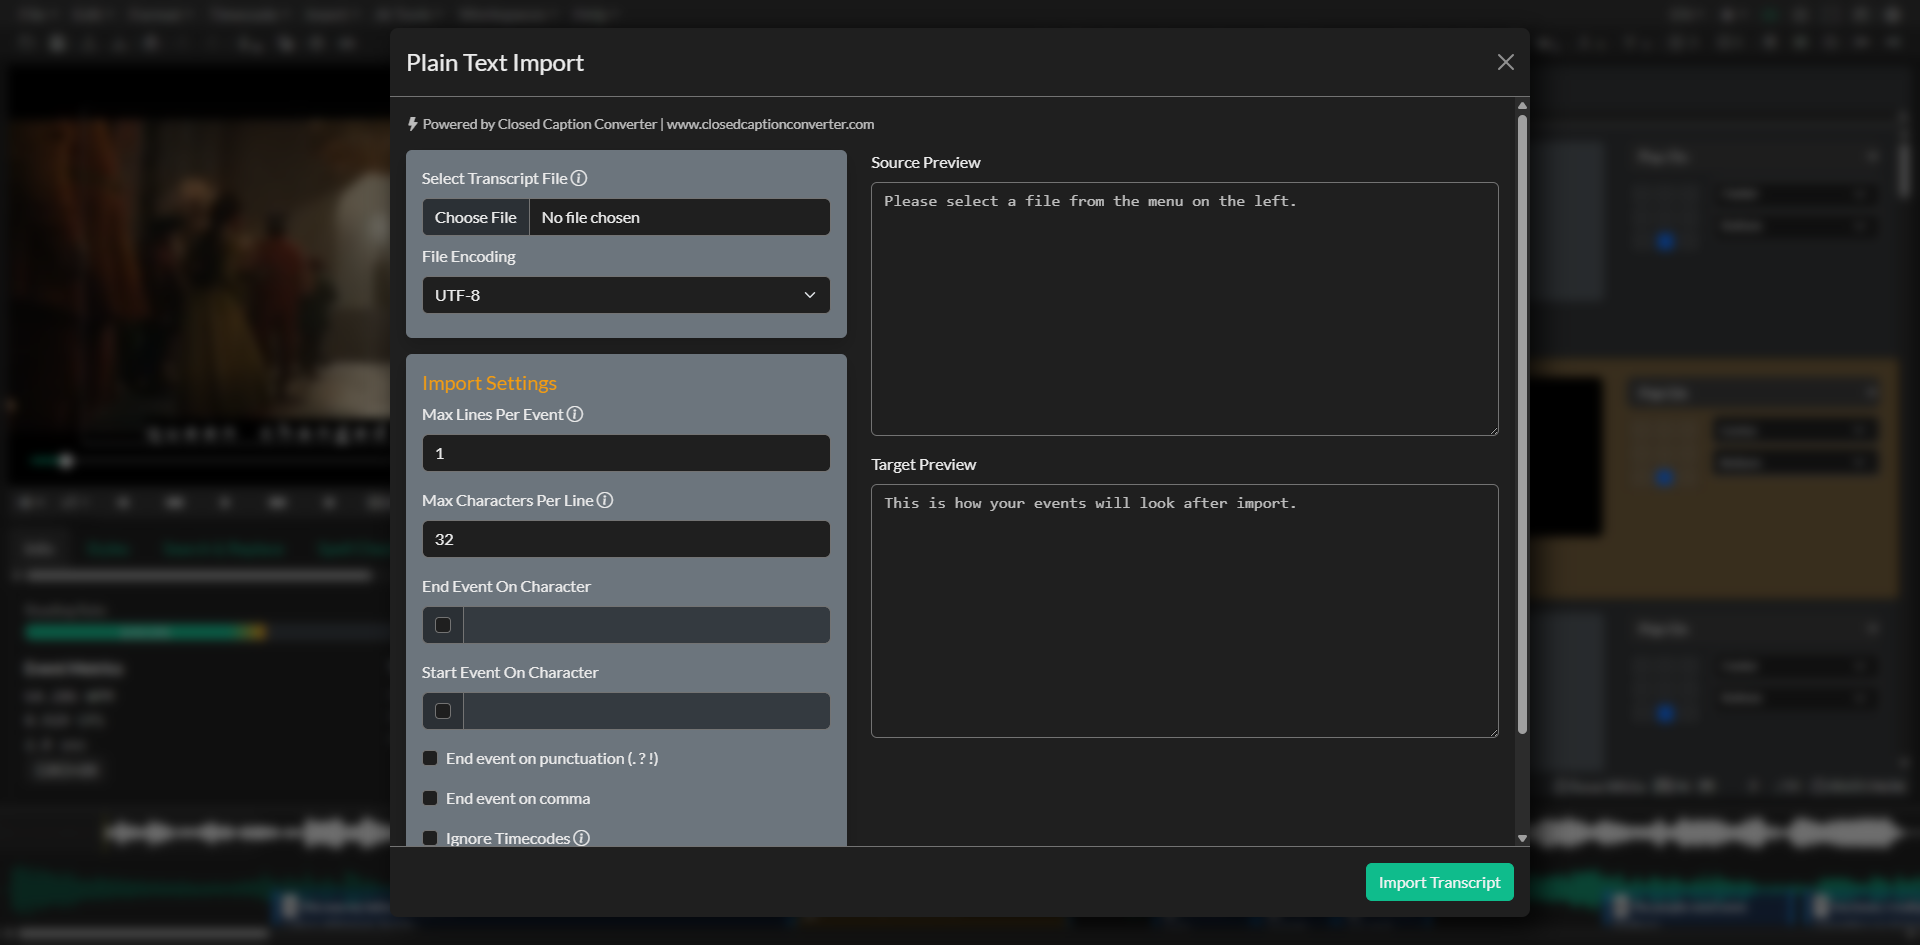
One of the most powerful features of the Plaintext Import tool is its dual-preview interface that provides complete visibility into how your text will be transformed before you commit to the import. This preview system eliminates guesswork and allows you to iterate on your settings until the output matches your expectations exactly.
The Source Preview displays the raw file contents in an editable textarea, showing you exactly what was read from your selected file. This view allows you to verify that the file encoding was correctly detected and that all characters are displaying properly. You can even make quick edits directly in this preview area if you spot minor issues that don't warrant re-saving and re-importing the file.
The Target Preview shows the formatted output as it will appear after import, rendered in a read-only monospaced textarea that clearly delineates Event boundaries using double line breaks. This preview updates in real-time as you adjust any of the import settings, providing immediate feedback on how changes to max lines, max characters, or punctuation handling will affect the final result. The preview uses exactly the same processing logic as the actual import function, ensuring that what you see is precisely what you'll get.
For performance reasons, the preview is limited to the first 25 Event blocks, which is typically sufficient to evaluate your settings and verify the formatting approach. When your transcript would generate more than 25 blocks, the preview displays a message indicating how many additional blocks will be created during the full import. This limitation ensures that the real-time preview remains responsive even with very large transcript files, while still giving you enough visibility to make informed decisions about your import settings.
Workflow Guide
To import a plaintext transcript, begin by opening the Plaintext Import modal from File → Import → Plaintext (Transcript). Click the file selector and navigate to your TXT or DOCX file, selecting the appropriate file encoding if you're working with international content containing special characters. Once the file loads, the Source Preview will populate with your transcript content, allowing you to verify that everything imported correctly.
Next, configure your import settings based on how you want the text to be structured. Consider your delivery requirements when setting the max lines per Event and max characters per line—broadcast subtitles often use 2 lines with 32 characters each, while web subtitles might use different specifications. Enable the punctuation detection options if you want the system to automatically create Event breaks at natural sentence boundaries, or use the custom character options if your transcript includes special formatting markers.
As you adjust these settings, watch the Target Preview update in real-time to show how your transcript will be formatted. Pay particular attention to how the text is being broken into Events—are the breaks happening at natural points, or do you need to adjust your punctuation settings? Are the lines wrapping at appropriate lengths, or should you modify the character limit? The preview makes it easy to iterate quickly, trying different configurations until you achieve the desired result.
If your transcript includes embedded timecodes that you want to remove, enable the Ignore Timecodes option and verify in the Source Preview that the timecodes have been stripped cleanly. This is particularly useful when working with vendor transcripts that include timing information you plan to regenerate or when you need to reimport transcripts for text-only editing.
Once you're satisfied with the preview, decide whether to create a new Event Group or import into an existing one. If creating new, select the appropriate type, language, and RTL settings for your content. If importing into an existing group, choose whether to merge the new Events with your existing work or replace the existing Events entirely. Finally, click the Import button to complete the process, and your Events will appear in the editor timeline, ready for timing, review, and refinement.
TextTranscript Profile Alternative
If you've already manually formatted your transcript with the exact line breaks and structure you want to preserve, you should use the textTranscript profile in the Subtitle Import modal instead of the Plaintext Import feature. This alternative import method is specifically designed for pre-formatted transcripts where you've already done the work of breaking text into appropriate caption segments.
You can access the textTranscript profile by navigating to File → Import → Subtitle File and selecting "Text Transcript" from the profile dropdown when choosing a TXT file. The key difference is that this profile preserves your existing line breaks when Block Import is enabled, treating each paragraph (separated by double line breaks) as a complete Event without restructuring the text. This approach respects the formatting decisions you've already made, making it ideal when you're importing transcripts that have been manually segmented by a transcriptionist or editor.
Additionally, the textTranscript profile can automatically generate timing information based on reading rate (measured in characters per second, or CPS), calculating appropriate durations for each Event and creating sequential timecodes. This makes it a complete solution for pre-formatted transcripts, handling both the structure preservation and the timing generation in a single import operation. The Plaintext Import feature, by contrast, focuses on raw text processing and intelligent Event creation without timing, making it better suited for unformatted transcripts that need to be segmented and structured from scratch.
Troubleshooting
When you see garbled text or unexpected characters in the Source Preview after importing a file, the issue is almost always related to character encoding. Try selecting a different encoding from the dropdown menu, starting with common alternatives like ISO-8859-1 (Western European), Windows-1252 (Windows Western), or UTF-16 if you're working with files created on different operating systems or with specific language requirements. The correct encoding will cause the special characters to display properly, and the change will immediately reflect in both the Source and Target previews.
If you're experiencing unexpected Event breaks in the middle of sentences, particularly after abbreviations like "Dr." or "Inc.", verify that the End Event On Punctuation option is enabled, as this activates the smart abbreviation detection that prevents false breaks. However, if you encounter an abbreviation that isn't recognized by the system (the detection includes approximately 40 common abbreviations, but specialized or uncommon ones may not be included), your best option is either to switch to the textTranscript profile in the Subtitle Import modal where you have more manual control, or to adjust the punctuation settings temporarily to import the content and then manually fix the specific segments.
When the preview looks correct but the actual import results differ from what you expected, verify that you didn't change any settings between reviewing the preview and clicking the Import button. The preview updates in real-time as you adjust controls, but if you modify a setting after checking the preview and then immediately import, the results will reflect the changed settings rather than what you saw in the preview. Always do a final preview check immediately before importing to ensure your settings are exactly as intended.
Related Pages
- Subtitle File Import - For pre-formatted transcripts using the textTranscript profile
- Subtitle Export - Exporting your completed Events to delivery formats
- First Project - Getting started with project creation and Event Groups
- Loading Projects - Managing your project files and workflows