Subtitle File Import
Subtitle File Import allows you to bring existing caption and subtitle files into Closed Caption Creator for continued editing, quality control, or format conversion. Whether you are receiving files from translation vendors, importing legacy archives, or combining multiple subtitle tracks into a single project, the import workflow provides the flexibility and format support you need to work with virtually any subtitle format used in broadcast and digital distribution.
Supported formats
Thanks to the integration with Closed Caption Converter, Closed Caption Creator supports over 35 different subtitle and caption file formats. This includes web formats such as WebVTT and SRT, broadcast formats such as SCC, MCC, and EBU STL, and specialized formats including CSV, DOCX, XLSX, and proprietary caption formats. The broad format support ensures that you can work with files from any source without the need for external conversion tools or manual reformatting.
When importing files, Closed Caption Creator automatically detects the file extension and presents the appropriate decoding profiles for that format. Some formats support multiple variants or encoding standards, and you can select the specific profile that matches your source file to ensure accurate decoding.
Opening the import dialog
To import a subtitle file, navigate to File in the menu, select Import, choose Subtitle from the list of import options, and click Next. This will open the Subtitle Import dialog where you can select your source file and configure import settings.
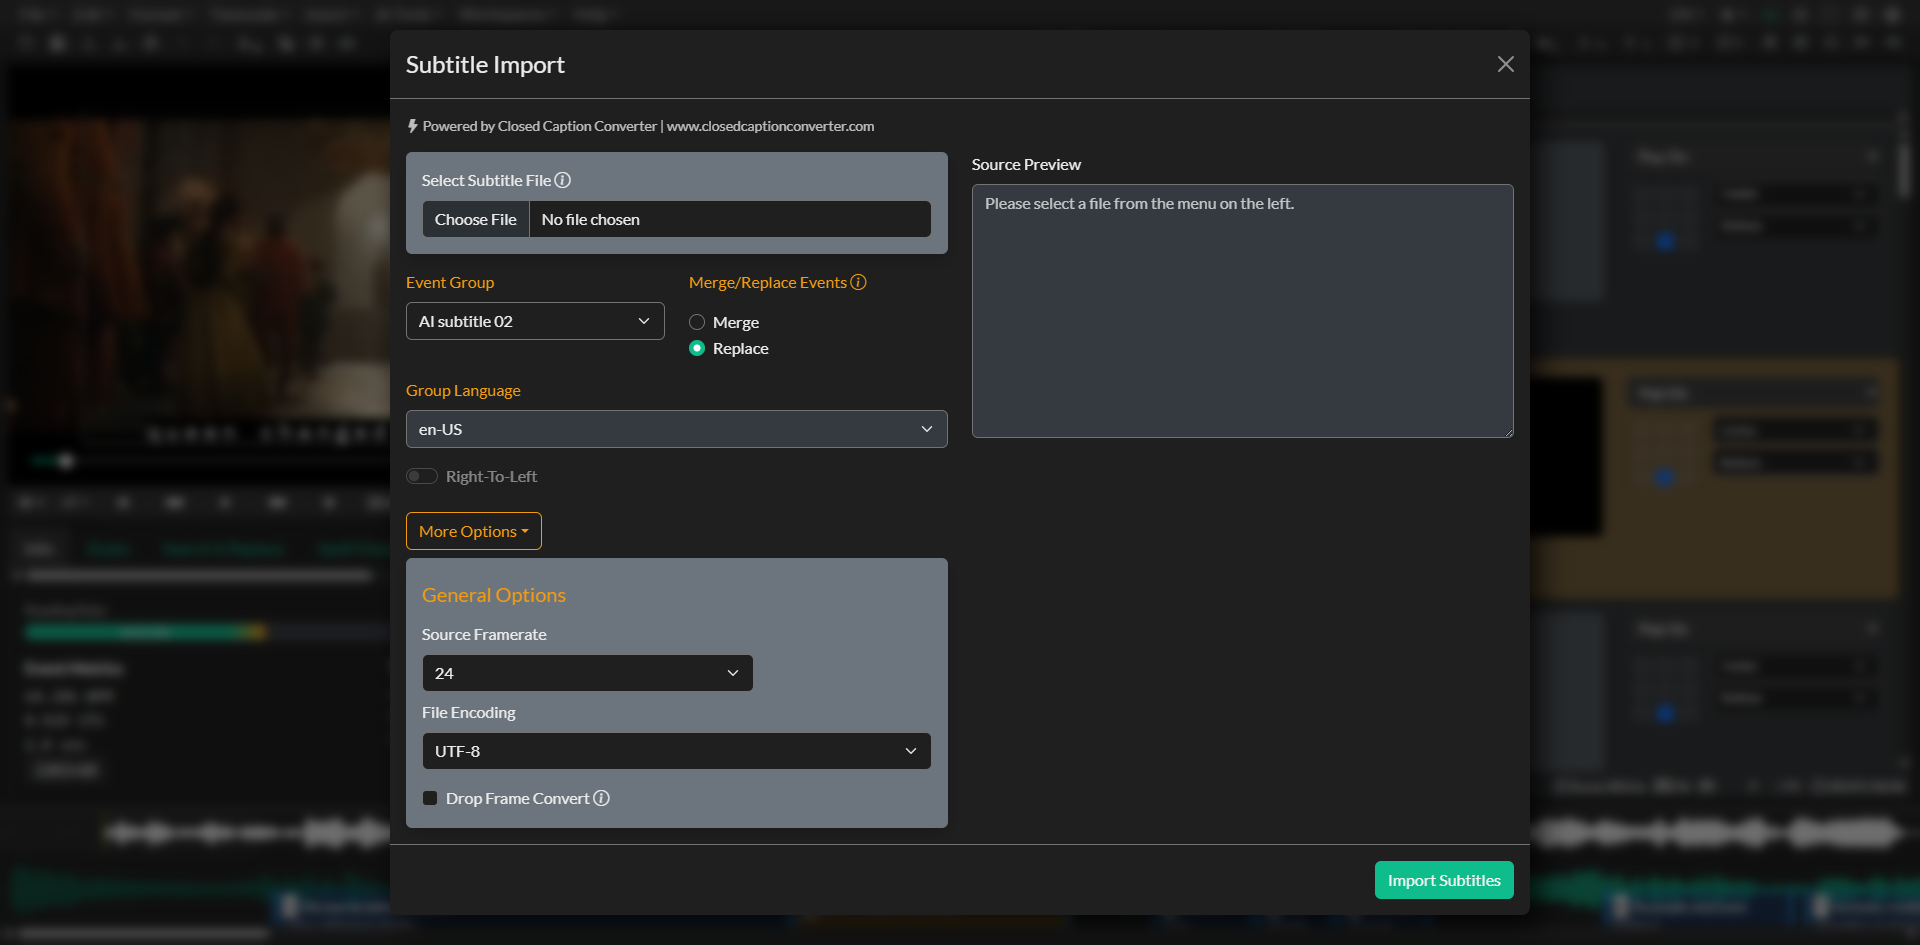
The import dialog is divided into several sections that guide you through the process. On the left side, you will find the file selection controls, Event Group targeting options, and advanced decoding settings. On the right side, a source preview displays the raw file contents so you can verify that the file is being read correctly before importing.
Selecting a file and profile
Click the file picker to select a subtitle file from your local drive. Once you select a file, Closed Caption Creator will automatically detect the file extension and display the appropriate decoding profile options if multiple profiles are available for that format.
For example, if you import a CSV file, the decoding options will allow you to specify which columns correspond to the start time, end time, and text content. This flexibility ensures that you can import files from custom workflows or legacy systems that may use non-standard column arrangements.
The source preview panel will display the raw file contents after the file is loaded. If the preview appears garbled or incorrect, you may need to adjust the file encoding setting in the advanced options to match the character encoding of your source file.
Targeting an Event Group
After selecting your file, you need to choose where the imported Events will be placed. You can import into a new Event Group or select an existing Event Group from the dropdown menu.
If you choose to create a new Event Group, the import process will create an Event Group with the same name as your source file and apply default Event Group settings. You can also specify the language and text direction for the new Event Group, which is particularly important when working with right-to-left languages or multilingual projects.
If you select an existing Event Group, you have two options for how the imported Events will be handled. The Merge option will add the imported Events to the existing Events in the selected Event Group, preserving all existing content. This is useful when combining multiple subtitle files together or appending additional segments to an existing track. The Replace option will delete all existing Events in the selected Event Group and replace them with the imported Events, effectively overwriting the current content.
Advanced import options
The More Options section provides additional controls for fine-tuning the import process. These settings are particularly important when working with files that have different technical specifications than your current project settings.
The source frame rate setting allows you to specify the frame rate of the imported file if it differs from your project frame rate. Closed Caption Creator will automatically convert timecodes during import to ensure that Events align correctly with your project timeline. If you are importing a file with a 29.97 frame rate, you can also specify whether the source file uses drop frame or non-drop frame timecodes.
The file encoding setting controls how text characters are interpreted when reading the source file. If your file contains special characters, accented letters, or non-Latin scripts, you may need to adjust this setting to match the encoding used when the file was created. Common encodings include UTF-8, ISO-8859-1, and Windows-1252.
The drop frame conversion option is useful when your source file uses a different drop frame standard than your project. When enabled, Closed Caption Creator will convert timecodes from the source drop frame format to match your project settings, ensuring accurate timing alignment.
Certain subtitle formats also provide format-specific decoding options. For example, EBU STL files may include metadata fields, encoding options, or subtitle positioning data that require special handling during import. These options will appear in the decoding options section when you select a format that supports advanced configuration.
Automatic offset and overlap detection
When you import a file, Closed Caption Creator will automatically analyze the timecodes in the imported Events and compare them to your project settings. If the first Event in the imported file starts at a timecode that does not match your project incode, you will be prompted to apply an automatic offset to align the imported Events with your project timeline. This is particularly helpful when importing files that were created with a different timecode start point or when working with segmented delivery workflows.
Closed Caption Creator will also check for overlapping Events during import. If overlaps are detected, you will be asked whether you want to automatically fix the overlaps by adjusting Event timing. This ensures that your imported content meets broadcast compliance standards and prevents playback issues when Events are displayed simultaneously.
Common import scenarios
Subtitle File Import is valuable in many production workflows. You might import a file received from a translation vendor to review and edit the translation before final export. You might bring in a legacy caption file from an archive to update formatting, fix timing issues, or convert to a modern delivery format. You might also combine multiple subtitle files from different sources into a single project, using the merge function to build a complete multilingual deliverable.
If you are working with specialized formats such as CSV or XLSX, you can import custom transcript or dialogue list files by mapping the appropriate columns to Closed Caption Creator fields. This is particularly useful when integrating with non-standard production systems or when migrating content from proprietary platforms.
Troubleshooting import issues
If you encounter issues during import, there are several steps you can take to diagnose and resolve the problem. First, check the source preview panel to ensure that the file contents are being read correctly. If the preview shows garbled text or incorrect characters, adjust the file encoding setting and reload the file.
If the imported Events appear in the wrong positions on the timeline, verify that the source frame rate and drop frame settings match the specifications of your source file. Incorrect frame rate settings can cause timecode misalignment and result in Events appearing at unexpected times.
If certain Events are missing after import, check whether the source file uses a format or feature that requires special decoding options. Review the available profiles for your file extension and select the profile that matches your source file specifications.
If you continue to experience issues importing a subtitle file, contact the support team and provide the source file if possible. The team can review the file structure and help identify the correct import settings or address any format-specific compatibility issues.