Project Import
Project Import allows you to load existing .ccprj (Closed Caption Project) files into Closed Caption Creator with flexible control over what data gets imported and how it integrates with your current workspace. Whether you need to restore a complete archived project, merge work from multiple team members, share standardized speaker definitions across projects, or combine subtitle tracks from different sources, the Project Import workflow provides the precision and flexibility required for professional collaboration and project management.
The import dialog supports two distinct modes of operation. Regular import performs a complete project replacement, loading all project settings, media references, Event Groups, metadata, speakers, markers, and style configurations from the archived .ccprj file. Merge import, by contrast, provides selective, additive import capabilities that allow you to combine specific elements from multiple projects without overwriting your existing work. This makes merge import particularly valuable for team-based workflows where different contributors work on separate aspects of a project that must be consolidated into a unified deliverable.
Video tutorial
Opening the import dialog
To import a project file, navigate to File in the menu, select Import, choose Project from the list of import options, and click Next. This opens the Project Import dialog where you can select your .ccprj file and configure how the imported data will be integrated into your current workspace.
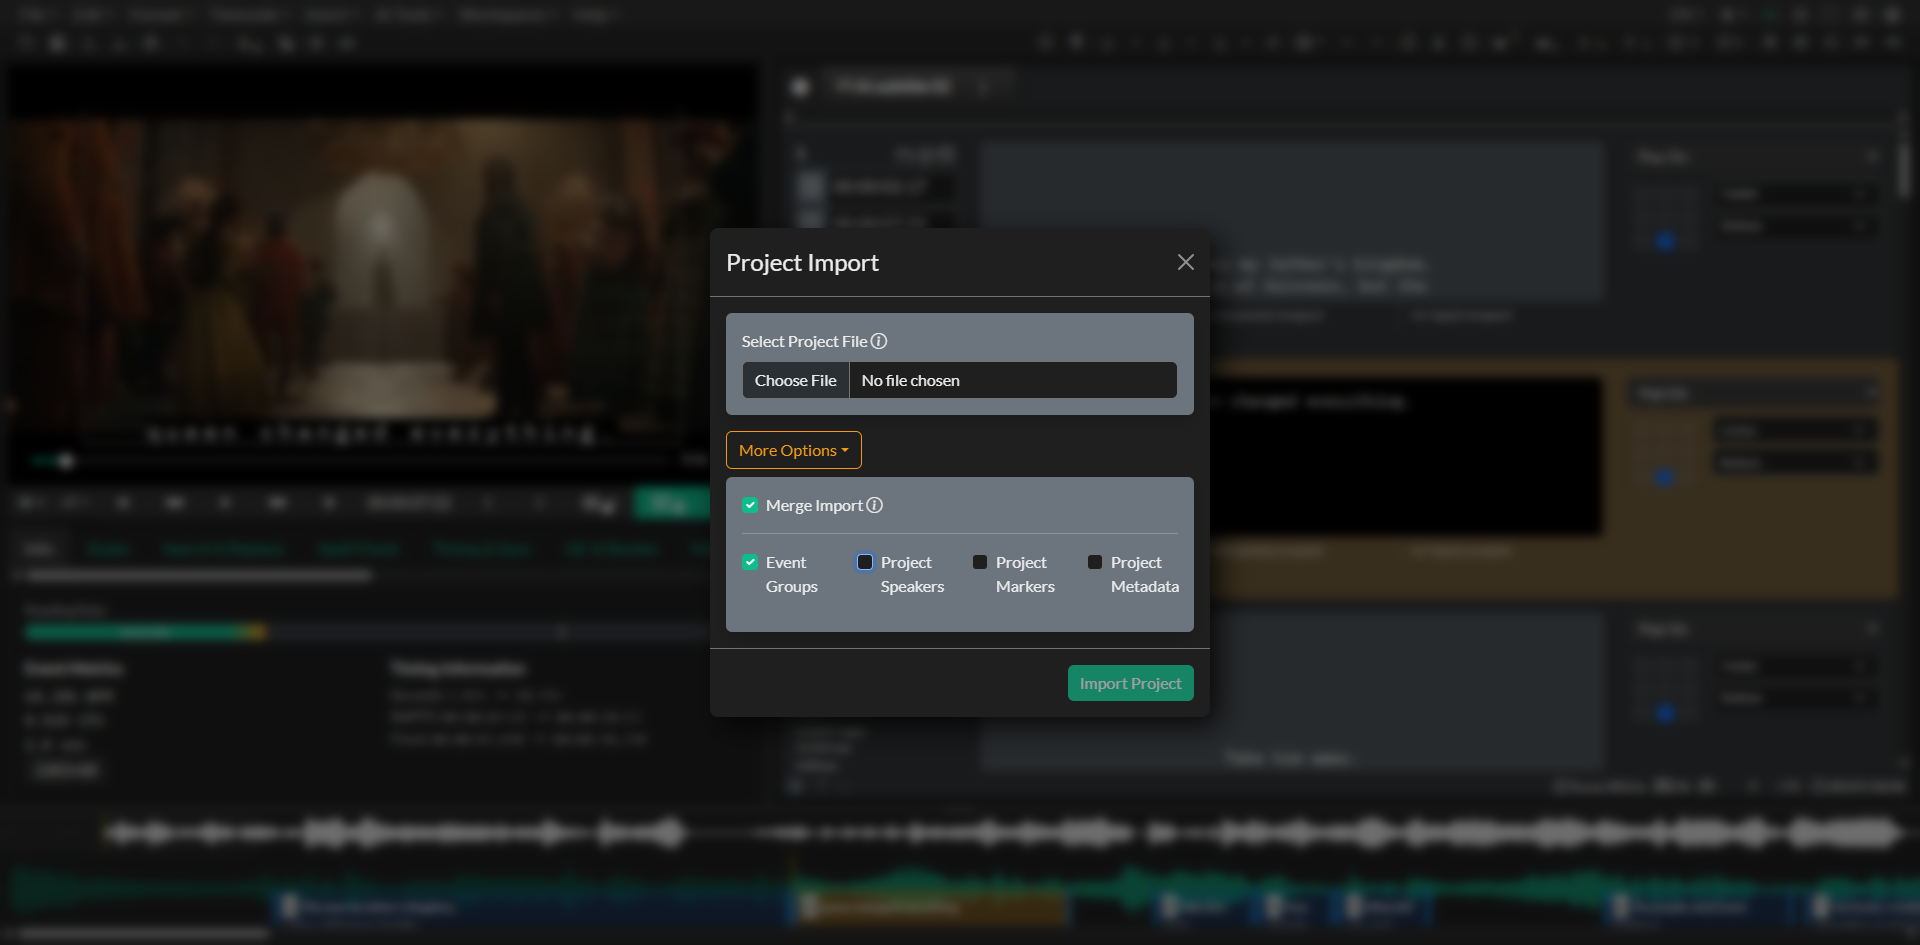
The import dialog presents a clean interface with a file picker that accepts only .ccprj files, ensuring you select the correct file type. Once you select a project file, you can choose whether to perform a standard full import or enable advanced options by clicking the More Options button. The More Options section reveals the merge import checkbox and selective import controls that give you granular control over which project elements are imported and how they integrate with your existing project.
Understanding the CCPRJ file format
Project files in Closed Caption Creator use the .ccprj extension and contain a complete snapshot of your project data in JSON format. These files are created through the File Export workflow, accessible by navigating to File, selecting Export, and choosing Project File from the export options menu. When you export a project file, Closed Caption Creator captures all seven critical project states including project settings, Event Groups with all Events, metadata definitions, speaker configurations, marker lists, quality control issues, and style guide settings.
The .ccprj format is designed to be a portable, self-contained archive that preserves the complete state of your project for backup, transfer, or collaboration purposes. Because project files contain references to media files rather than the media files themselves, you may need to re-import or re-link media when restoring a project on a different system or after moving your source media to a new location. The import process will guide you through media re-import when necessary, ensuring that your project timeline and synchronization remain accurate.
Merge import
Merge import is one of the most powerful features in Project Import, enabling you to combine elements from multiple projects without replacing your current work. When you enable the merge import checkbox, Closed Caption Creator switches from replacement mode to additive mode, meaning that imported data is added alongside your existing project data rather than overwriting it.
This functionality is essential for team collaboration workflows where different team members work on separate Event Groups, speaker definitions, or marker sets that need to be consolidated into a single master project. For example, if one team member creates English subtitles while another creates Spanish subtitles in separate project files, you can use merge import to bring both Event Groups into a unified project without losing either track.
When merge import is enabled, four selective import checkboxes become available, allowing you to choose exactly which project elements you want to import. All four options are enabled by default when you first activate merge import, but you can deselect any option to exclude that data from the import process. This granular control ensures that you import only the data you need and avoid unintentionally duplicating or overwriting project elements that should remain unchanged.
Selective import options
The selective import options allow you to specify which categories of project data should be imported when using merge import mode. Understanding how each option behaves helps you make informed decisions about what to include in your import operation.
The Event Groups option imports all Event Groups from the source project file along with all Events contained within each group. When imported, these Event Groups are appended to your existing Event Groups rather than replacing them, meaning you can accumulate subtitle tracks, transcription tracks, translation tracks, and other Event Group types from multiple sources. Each imported Event Group retains its original name, type, language settings, text direction, and Event Group-specific settings such as maximum characters per second and maximum words per minute. After import completes, the most recently imported Event Group becomes the selected Event Group in the interface, allowing you to immediately review the imported content.
The Project Speakers option imports speaker definitions from the source project file into your current project. Speakers in Closed Caption Creator define the individuals or characters who speak dialogue in your media, and speaker definitions can include names, colors for visual identification in the editor, and metadata associations. When you import speakers through merge import, the speaker definitions are added to your existing speaker list, making them available for assignment to Events throughout all Event Groups in your project. This is particularly useful when working with standardized speaker libraries that need to be shared across multiple projects or when consolidating work from different team members who have defined speakers independently.
The Project Markers option imports marker lists and individual markers from the source project file. Markers in Closed Caption Creator identify specific timecode positions in your media, such as shot changes, scene transitions, commercial breaks, or other reference points that help guide subtitle placement and timing decisions. Unlike Event Groups and Speakers, which are added additively during merge import, markers completely replace your existing marker data when imported. This behavior ensures that marker timing remains consistent with the source project and prevents conflicts that could arise from merging time-based reference data. If you have existing markers that you want to preserve, you should avoid importing markers during merge import, or export your current markers to a separate project file before performing the import.
The Metadata option imports project-level metadata from the source project file into your current project. Metadata in Closed Caption Creator consists of custom key-value pairs that store production information, delivery specifications, client requirements, or any other structured data relevant to your project. When you import metadata through merge import, the metadata entries from the source file are appended to your existing metadata list. This allows you to accumulate metadata from multiple sources or apply standardized metadata templates across projects by importing from a reference project file that contains your organization's standard metadata schema.
Regular import mode
When merge import is disabled, Project Import operates in regular import mode, performing a complete project replacement. This mode is appropriate when you want to restore an archived project, load a project file created by another user, or replace your current project entirely with different content.
Regular import triggers the LoadProjectFile workflow, which guides you through the complete project restoration process. First, Closed Caption Creator resets all current project states, clearing Event Groups, metadata, speakers, markers, quality control issues, and style settings to prepare for the incoming project data. Next, the import process loads all project settings from the .ccprj file, including frame rate, drop frame settings, project incode, and other timing configurations that ensure your project maintains the correct temporal alignment.
After project settings are loaded, Closed Caption Creator processes media references from the project file. If media files are stored locally, the import workflow will attempt to locate the referenced files at their original paths. If the files cannot be found at the expected locations, you will be prompted to browse for the media files manually or select new media files that match the project requirements. If your project uses cloud-based media storage through integrations with Vimeo, YouTube, HLS streaming, or other platforms, the import process will re-establish those connections using the stored references in the project file.
Once media files are located or re-linked, Closed Caption Creator performs audio extraction and waveform generation if necessary, ensuring that the audio visualization in the media player matches your source media. A progress indicator displays the import status as each project component is loaded and initialized. When the import process completes, your project is fully restored and ready for editing, review, or export.
Version conversion
Closed Caption Creator includes automatic version conversion capabilities that ensure compatibility with project files created in earlier versions of the application. The current project file format is version 3, which introduced several structural improvements and expanded metadata support compared to legacy formats.
When you import a project file created with an earlier version, Closed Caption Creator automatically detects the version number in the file header and performs the necessary conversions to upgrade the data to the current format. This conversion process preserves all critical caption data, timing information, styling attributes, and project settings while restructuring the data to match the current format specification.
The version conversion workflow handles legacy caption structures that used different syntax for text formatting, positioning metadata, and style attributes. For example, earlier versions may have stored bold, italic, and underline formatting as separate boolean flags on each caption line, while the current format consolidates these attributes into rich text markup. The conversion process translates these legacy structures into the modern format without data loss, ensuring that your archived projects remain accessible and editable regardless of when they were created.
Version conversion also migrates transcription data from legacy projects, preserving any automatically generated or manually entered transcripts and converting them into properly structured Event Groups in the current project format. Frame rate and drop frame settings are translated from legacy property names to the current schema, and positioning data is converted from legacy coordinate systems to the standardized positioning model used in version 3.
This automatic conversion capability means you can confidently archive project files for long-term storage without concern that future application updates will render your archives inaccessible. When you need to restore or reference an old project, simply import the .ccprj file and Closed Caption Creator will handle the version migration transparently.
Common use cases
Project Import supports a wide range of professional workflows that require project archiving, collaboration, template reuse, and data consolidation.
Archival and recovery workflows rely on Project Import to restore projects from backup storage. Whether you need to revisit a project for client revisions, create a derivative version for a different distribution platform, or recover work after a system migration, exporting and importing .ccprj files ensures that your complete project state is preserved for future access. The combination of Project Export and Project Import creates a robust archival workflow that protects your work against data loss and provides long-term accessibility to your production assets.
Team collaboration scenarios frequently use merge import to consolidate work from multiple contributors. In professional subtitle production, it is common for different team members to work on different language tracks simultaneously, with one translator creating French subtitles while another creates Spanish subtitles, both working from the same source media and timecode references. Merge import allows the project lead to load each translator's project file and import their respective Event Groups into a unified master project that contains all language versions. The selective import options ensure that each contributor's work is preserved without conflicts or overwrites.
Template and standardization workflows use Project Import to apply consistent settings, speaker definitions, and metadata schemas across multiple projects. If your organization maintains standard speaker libraries for recurring programs, you can create a template project file that contains the complete speaker list and then merge import those speakers into new projects as needed. Similarly, if you have standardized metadata requirements for client deliverables, you can create a reference project with the required metadata fields and import that metadata into active projects to ensure consistency.
Quality control and marker sharing workflows benefit from the ability to import marker lists across projects. If a post-production supervisor creates a marker set indicating shot changes, commercial break points, or timing reference positions, that marker data can be exported as part of a project file and then imported into projects being worked on by different editors or translators. This ensures that all team members work from the same timing references and maintain spatial and temporal consistency across different deliverable versions.
Multi-format delivery workflows sometimes require merging different Event Group types that were created or edited separately. For example, you might have one project file containing standard subtitles and another project file containing audio description Events for accessibility compliance. Using merge import, you can combine both Event Groups into a single project, allowing you to manage both deliverables together, ensure timing coordination between the subtitle and audio description tracks, and export both formats from a unified workspace.
Project export workflow
Project files are created through the Project Export workflow, which captures the complete state of your current project and saves it as a .ccprj file. To export a project, navigate to File in the menu, select Export, choose Project File from the export format list, and specify where you want to save the file. The export process creates a JSON-formatted file that contains all seven project states in a structured, human-readable format.
Project Export and Project Import work together as complementary workflows that enable roundtrip project portability. Any time you export a project file, you can subsequently import it back into Closed Caption Creator to restore that exact project state. This roundtrip capability is the foundation for all archival, collaboration, and version control workflows in professional subtitle production.
For more detailed information about the Project Export workflow, including best practices for archiving projects and preparing project files for team distribution, refer to the Project Export documentation.
Troubleshooting
If you encounter issues when importing a project file, there are several diagnostic steps that can help identify and resolve the problem.
If the import dialog does not open or the file picker does not appear, verify that you are following the correct navigation path by selecting File, then Import, then Project, and clicking Next. If you attempt to import a file through a different workflow such as Subtitle File Import, the dialog will not accept .ccprj files and you will need to cancel and restart the import process using the correct menu path.
If you select a project file but receive an error message indicating that the file cannot be read or parsed, verify that the file has a .ccprj extension and was created by Closed Caption Creator through the Project Export workflow. Files from other captioning applications or files that have been manually edited or corrupted may not conform to the expected JSON structure and cannot be imported. If you believe the file should be valid, try opening the file in a text editor to verify that it contains valid JSON data beginning with standard project properties.
If media files cannot be found after importing a project, this is expected behavior when the project file was created on a different system or when media files have been moved or renamed since the project was exported. When prompted, browse to the correct media file location and reselect your source media. Closed Caption Creator will re-import the media and regenerate audio waveforms as needed. If you have moved your media files to a new folder structure, note the new paths so that future exports from this system will reference the correct locations.
If you perform a merge import and notice unexpected data in your project, review the selective import checkboxes to confirm which options were enabled during import. If you accidentally imported Event Groups, speakers, metadata, or markers that you did not intend to merge, you can use the undo function immediately after import to revert the changes, or you can manually delete the unwanted items from the respective panels in the interface. Remember that marker import replaces existing markers rather than merging them, so if you lose marker data after import, you will need to restore from a backup or re-create the markers manually.
If you import a project file and notice that timing appears incorrect or Events do not align with the media playback, verify that the frame rate and drop frame settings in the imported project match your source media specifications. Frame rate mismatches can cause cumulative timing drift that becomes more pronounced as the project progresses. If necessary, you can adjust the project frame rate and drop frame settings after import using the project settings dialog, though this may require re-timing Events to account for the frame rate change.
If you continue to experience difficulties importing a project file or encounter unexpected behavior after import, contact the support team and provide details about the import mode you used, the selective options you enabled if using merge import, and any error messages that appeared during the process. If possible, share the .ccprj file with the support team so they can analyze the file structure and identify any compatibility or data integrity issues.