Project Frame Rate & Incode
Project frame rate and incode define the timing foundation for all Events in your project and ensure accurate synchronization with your source media. These settings control how timecode is displayed throughout the application, how Events align to frame boundaries on the timeline, and how your captions match the burnt-in timecode (BITC) visible on your video. Understanding and properly configuring these settings is essential for professional broadcast workflows and accurate caption delivery.
Understanding Video Frame Rate
Frame rate refers to the number of individual images, or frames, displayed per second in a video. This measurement is expressed in frames per second, commonly abbreviated as fps. Frame rate is one of the most fundamental properties of video media because it determines the temporal resolution of your content and defines the smallest unit of time you can work with when creating timed subtitles and captions.
Different broadcast standards and media formats use different frame rates based on historical technical requirements and regional conventions. The frame rate of your project should always match your source media and your final delivery requirements to ensure accurate timing and proper synchronization between your captions and the video playback.
Higher frame rates such as 60 fps provide finer timing precision and more granular control over Event positioning on the timeline. Lower frame rates such as 24 fps have larger minimum time increments between frames, which affects how precisely you can time caption appearances and disappearances. Understanding the relationship between frame rate and timing precision helps you make informed decisions about Event placement and ensures your captions meet broadcast technical specifications.
Supported Frame Rates
Closed Caption Creator supports seven standard frame rates that cover the full range of professional broadcast, film, and digital distribution formats. Each frame rate has specific use cases and delivery requirements based on regional broadcast standards and production workflows.
The 23.976 fps frame rate is commonly used for film-originated content destined for NTSC broadcast distribution. This rate represents 24 fps slowed down by approximately 0.1 percent to maintain compatibility with NTSC color television standards. The 24 fps frame rate is the traditional cinema standard used for theatrical film projection and is widely used for streaming content and digital cinema distribution.
The 25 fps frame rate is the standard for PAL broadcast systems used throughout Europe, Australia, and many other regions worldwide. This frame rate aligns with the 50 Hz electrical systems common in PAL territories and is the required standard for broadcast delivery in these markets.
The 29.97 fps frame rate is the NTSC color television standard used for broadcast in North America, Japan, and other NTSC regions. Like 23.976, this represents 30 fps slowed down by 0.1 percent to accommodate NTSC color encoding. This is one of the most common frame rates for closed caption delivery in the United States. The 30 fps frame rate is used for some digital video formats and progressive scan content, though it is less common than 29.97 for broadcast applications.
The 59.94 fps and 60 fps frame rates are high frame rate standards used for sports broadcasts, high-motion content, and modern streaming platforms. The 59.94 rate follows the same 0.1 percent reduction pattern as other NTSC-derived rates, while 60 fps is used for progressive scan and digital-originated content.
When selecting a frame rate for your project, you should consider both your source media specifications and your final delivery format requirements. Different export formats and broadcast standards may require specific frame rates, and working in the correct frame rate from the beginning ensures accurate timing and simplifies your export workflow.
Drop Frame Timecode
Drop frame timecode is a compensation mechanism designed specifically for NTSC-derived frame rates of 29.97 fps and 59.94 fps. Understanding drop frame is essential for broadcast captioning workflows because it directly affects how timecode is displayed and how captions synchronize with video over long-form content.
A common misconception about drop frame timecode is that actual video frames are physically removed or skipped during playback. This is not the case. Drop frame timecode skips certain timecode values in the counting sequence, but every video frame is still present and played back normally. The purpose of this timecode adjustment is to maintain alignment between the timecode display and real clock time despite the fact that NTSC video runs slightly slower than whole-number frame rates.
The technical reason drop frame exists relates to the historical development of color television. When color encoding was added to the NTSC broadcast standard, the frame rate was reduced from exactly 30 fps to 29.97 fps to prevent interference between the color and audio signals. This 0.1 percent reduction means that for every hour of video, the timecode will drift approximately 3.6 seconds ahead of real clock time if standard non-drop frame counting is used. Over the course of a long program or live broadcast, this drift would cause significant synchronization problems.
Drop frame timecode compensates for this drift by skipping specific frame numbers at regular intervals. For 29.97 fps drop frame, frames numbered 00 and 01 are skipped at the start of each minute, except for minutes that are evenly divisible by ten. This means drops occur at 01, 02, 03, 04, 05, 06, 07, 08, and 09 minutes past each hour, but not at 00, 10, 20, 30, 40, or 50 minutes. For 59.94 fps drop frame, frames 00, 01, 02, and 03 are skipped following similar rules. These periodic adjustments keep the timecode display synchronized with actual elapsed clock time.
Drop frame timecode uses a semicolon as the separator before the frame digits to distinguish it from non-drop frame timecode. For example, drop frame timecode appears as 01:05:23;15, while non-drop frame uses colons throughout and appears as 01:05:23:15. This notation convention helps operators and systems immediately identify which timecode mode is in use.
Both 29.97 fps and 59.94 fps content can use either drop frame or non-drop frame timecode depending on workflow requirements and delivery specifications. Drop frame is generally preferred for broadcast delivery because it maintains synchronization with real time, which is critical for scheduling, live programming, and coordination with other broadcast systems. Non-drop frame may be used in post-production environments where frame-accurate editing is prioritized over real-time alignment. Other frame rates such as 24, 25, and 30 fps do not support drop frame because they either run at true whole-number rates or are not used in contexts where real-time synchronization is required.
Understanding Incode (Project Start Timecode)
The incode setting defines the starting timecode for your project and represents the timecode value that corresponds to the beginning of your media playback. In broadcast and professional video production environments, programs rarely begin at 00:00:00:00. Instead, they are assigned specific timecode starting values based on tape reels, program segments, or broadcast scheduling requirements.
Setting the correct incode ensures that the timecodes displayed throughout Closed Caption Creator match the burnt-in timecode (BITC) visible on your reference video. When BITC is present on your source media, matching the application's timecode display to the visible timecode is essential for quality control, client review, and coordination with other production team members who may be referencing the same timecode values.
The incode value is displayed and entered using standard SMPTE timecode notation in the format HH:MM:SS:FF, where HH represents hours, MM represents minutes, SS represents seconds, and FF represents frames. However, the application stores the incode internally as a seconds value to maintain precision and support accurate calculations across different frame rates. When you enter or modify the incode value, the application automatically converts between the timecode display format and the internal seconds representation.
For frame rates of 23.976 fps and 29.97 fps running in non-drop frame mode, the application applies a special multiplier during the conversion between timecode and seconds. This multiplier of approximately 1.001 compensates for the difference between media time (frame-accurate timing) and clock time (real-world elapsed time). This technical detail is handled automatically by the application, but it is important to understand that these non-real-time frame rates require special handling to maintain accurate timecode calculations.
The incode offset affects all timecode displays throughout the application. When you set an incode of 01:00:00:00, for example, the first frame of your media will display with that timecode rather than 00:00:00:00. All Event start and end times, timeline markers, and playhead positions will reflect this offset, ensuring consistency across your entire workflow. This makes it much easier to spot captions and verify timing when working from reference materials that use the same timecode base.
How Timecode Displays Work
Timecode is displayed throughout Closed Caption Creator in multiple locations, including the Event editor, the media player controls, the timeline, and the timecode input fields for each Event's start and end times. All of these timecode displays automatically respect your project's frame rate, drop frame setting, and incode offset, ensuring consistent timecode representation across the entire application.
The timecode input fields in the Event editor provide powerful functionality for entering and adjusting Event timing with frame-accurate precision. When you click on a timecode input field, you can type a new timecode value using several different input formats. The standard format is SMPTE timecode notation such as 01:23:45:12, but the application also accepts shorthand formats to speed up your workflow. You can type values with unit suffixes such as 5H for five hours, 30M for thirty minutes, 45S for forty-five seconds, or 15F for fifteen frames. You can also enter plain numbers, which the application will interpret as frame counts.
When you finish entering a timecode value and press Enter or click outside the input field, the application automatically validates and formats your entry according to the current project frame rate and drop frame settings. If you enter an invalid timecode value such as a frame number higher than the maximum for your frame rate, or a drop frame timecode that falls on a dropped frame value, the application will automatically correct it to the nearest valid timecode.
The timecode input fields also support frame-by-frame navigation using the arrow keys on your keyboard. When a timecode field is focused, pressing the up arrow increments the timecode by one frame, while pressing the down arrow decrements it by one frame. If you have video lock enabled, the media player will follow these adjustments, allowing you to scrub through your video one frame at a time while watching the visual changes. This frame-accurate navigation is invaluable for precise caption spotting and timing refinement.
Each timecode input field is accompanied by a set timecode button, represented by a clock icon. Clicking this button immediately sets the Event timecode to the current playhead position in the media player. This feature streamlines the caption spotting workflow by allowing you to play your video, pause at the desired in or out point, and click the corresponding button to capture that timing without manually entering timecode values. When you use this function, the application also performs intelligent adjustments such as setting a default duration if the end time is unset, or adjusting overlapping Events if minimum frame gap settings are enabled.
All timecode calculations and displays factor in your project's incode offset. If your incode is set to 01:00:00:00, the first frame of your media displays as 01:00:00:00 rather than 00:00:00:00, and all subsequent timecodes increment from that base. This incode offset is purely a display convention and does not affect the underlying frame-accurate timing of your Events, but it ensures that timecodes throughout the application match your source media and any external references.
Project Timing Settings Modal
The Project Timing Settings modal provides centralized access to configure your project's frame rate, drop frame mode, and incode value. This modal can be accessed from the Project menu by selecting Timing Settings. The settings configured in this modal apply to all Event Groups within your project, ensuring consistent timing parameters across all deliverables.
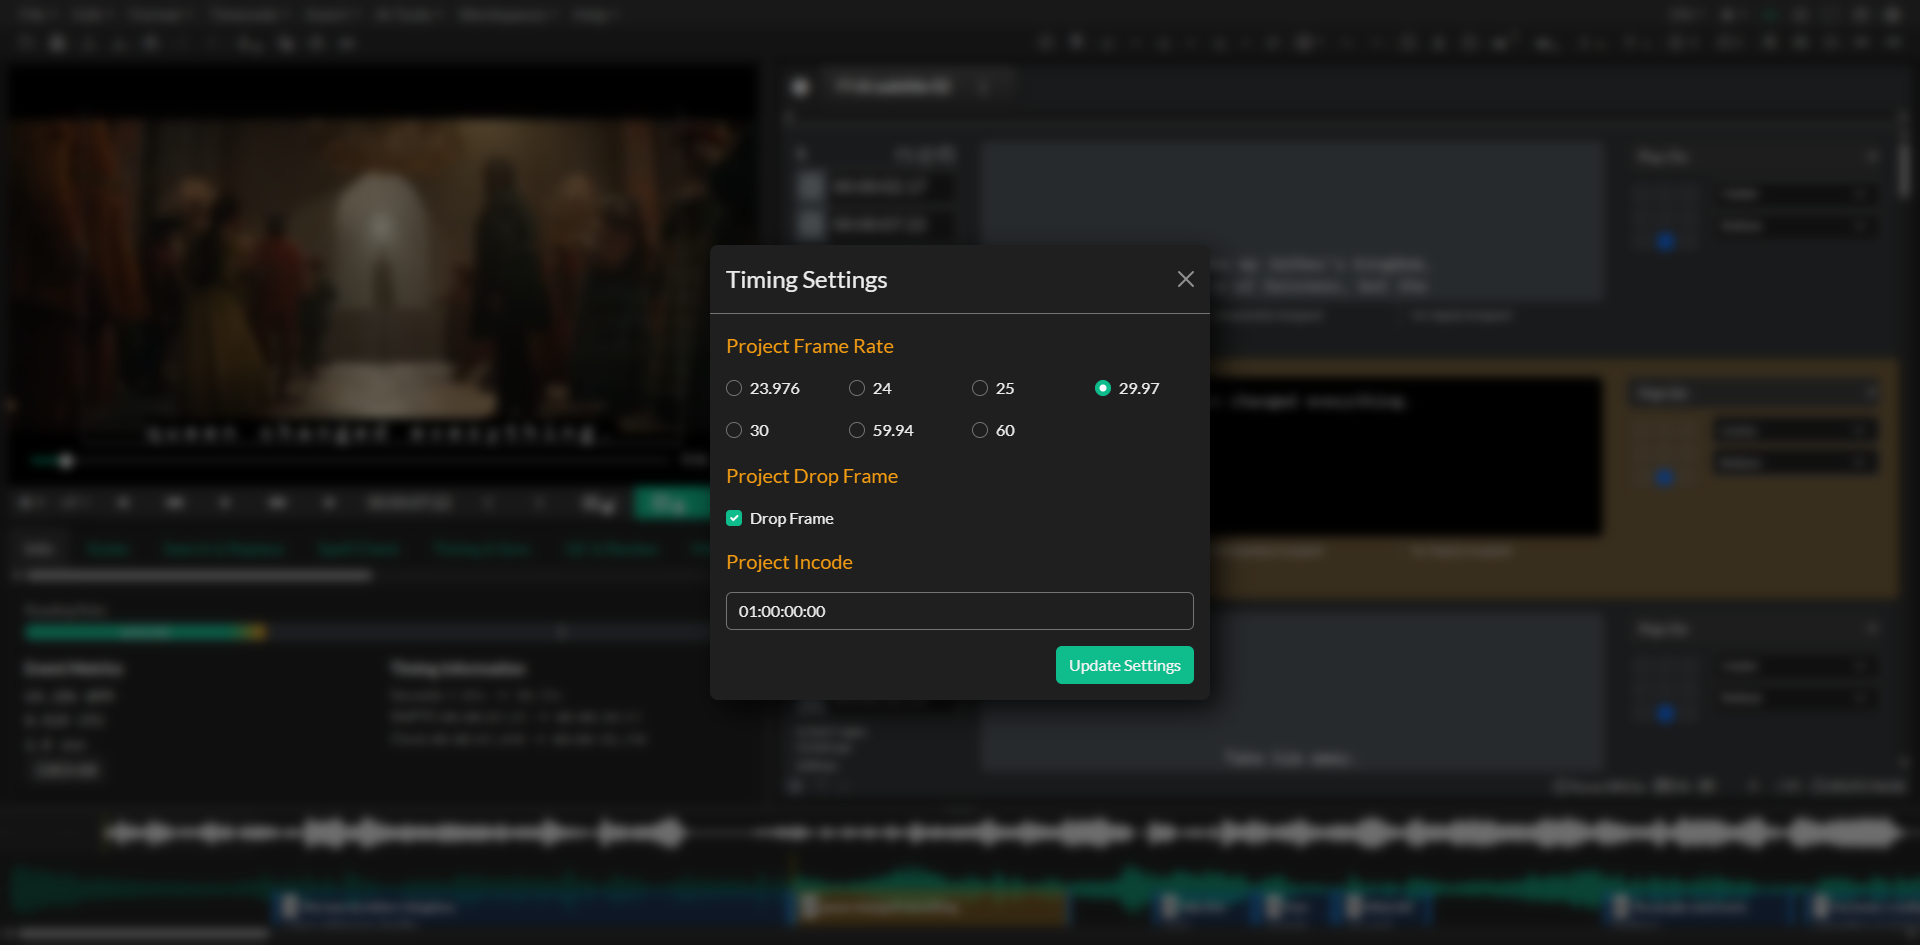
The modal presents three primary settings. The frame rate selector displays radio buttons for all seven supported frame rates: 23.976, 24, 25, 29.97, 30, 59.94, and 60 fps. Selecting a different frame rate will affect how Events are positioned on the timeline and how timecode values are calculated and displayed throughout the application.
The drop frame checkbox appears only when you have selected a frame rate of 29.97 or 59.94 fps, as these are the only rates that support drop frame timecode. Enabling this checkbox switches the timecode display mode to drop frame notation with semicolon separators, while disabling it uses non-drop frame notation with colons throughout. For other frame rates, drop frame is not applicable and the checkbox will not be visible.
The incode input field allows you to enter the starting timecode for your project. This field accepts timecode values in standard SMPTE format and validates your input according to the selected frame rate and drop frame mode. When you enter a new incode value, the application converts it to the internal seconds representation and applies the appropriate multiplier for non-real-time frame rates.
When you click the Update Settings button, the application recalculates all Event timecodes throughout your project to ensure they align with valid frame boundaries for the new frame rate. This recalculation process rounds each Event's start and end time to the nearest frame, which helps maintain frame accuracy and prevents timing drift that could occur from fractional frame values. All Event Groups in your project will be affected by this update, so it is important to verify your Event timing after making significant changes to project timing settings.
Changes made in the Project Timing Settings modal are automatically added to the undo and redo history, allowing you to revert timing setting changes if needed. This safety mechanism is particularly important when changing frame rates mid-project, as these changes can have far-reaching effects on Event positioning and reading speed calculations.
It is generally recommended to set your frame rate, drop frame mode, and incode correctly at the beginning of your project based on your source media specifications and delivery requirements. However, the Project Timing Settings modal provides the flexibility to adjust these parameters at any point in your workflow if your requirements change or if you initially configured the project with incorrect settings.
Auto-Detection During Media Import
When you import media files in the desktop version of Closed Caption Creator, the application automatically scans the file metadata to detect technical specifications including frame rate and embedded timecode information. This auto-detection feature uses FFmpeg to analyze the media file and extract relevant metadata, streamlining project setup and reducing the likelihood of configuration errors.
During the media import process, the application examines the video stream metadata to identify the frame rate at which the media was encoded. Common frame rate values detected from metadata are mapped to the standard frame rates supported by Closed Caption Creator. For example, if your video file metadata indicates a frame rate of 23.98 or 23.976, the application will map this to 23.976 fps. Similarly, frame rates near 29.97 or 59.94 will be correctly identified and mapped to those NTSC standards.
If the detected frame rate differs from your current project frame rate settings, the application will display a prompt asking whether you would like to update the project frame rate to match the source media. The prompt will indicate the detected frame rate value and give you the option to accept or decline the change. In most cases, you should accept this auto-detected value to ensure that your project timing matches the technical specifications of your source media. If you are working with proxy media or intentionally using a different frame rate for specific workflow reasons, you can decline the change and keep your current settings.
When the application detects a frame rate of 29.97 or 59.94 fps and you accept the frame rate update, the drop frame setting will be automatically enabled by default. This default behavior reflects broadcast industry standards where drop frame timecode is typically preferred for NTSC frame rates. You can manually adjust the drop frame setting later using the Project Timing Settings modal if your workflow requires non-drop frame timecode.
In addition to frame rate detection, the application also scans for embedded timecode tracks in the media file metadata. Many professional video formats include a timecode metadata track that indicates the starting timecode of the video file. This is particularly common in broadcast masters, archival transfers, and professional camera formats. If the application detects an embedded timecode value, it extracts the starting timecode and compares it to your current project incode setting.
When an embedded timecode is detected and differs from your project incode, a prompt will appear asking whether you would like to update the project incode to match the detected value. The prompt displays the detected timecode in SMPTE format and allows you to accept or decline the change. Accepting the detected incode ensures that the timecodes displayed throughout Closed Caption Creator match the burnt-in timecode or reference timecode on your video file, which is essential for accurate caption spotting and quality control workflows that rely on timecode matching.
It is important to note that auto-detection of frame rate and incode only functions with local media files accessed in the desktop version of the application. When importing media from cloud storage URLs, HLS manifest streams, or embedded platforms such as YouTube and Vimeo, metadata extraction is not possible and you will need to configure frame rate and incode settings manually based on your knowledge of the source media specifications. The auto-detection feature requires direct access to the video file container and metadata structures that are only available when working with local files.
How Settings Affect Your Project
The frame rate, drop frame mode, and incode settings have wide-ranging effects throughout your project that influence timeline behavior, timecode displays, quality control validation, and export compatibility. Understanding these effects helps you make informed decisions about project configuration and ensures your captions meet technical delivery requirements.
Frame rate determines the timeline granularity and defines the minimum time increment for Event positioning. Projects configured with higher frame rates such as 60 fps allow you to position Events with finer precision, spacing captions as close as approximately 16.7 milliseconds apart. Projects with lower frame rates such as 24 fps have a minimum increment of approximately 41.7 milliseconds between frames. This difference affects how precisely you can spot captions to match quick dialogue cuts or rapid on-screen action. When working on content with dense dialogue or fast-paced editing, higher frame rates provide more flexibility for accurate caption timing.
The drop frame setting ensures that long-form content maintains synchronization between timecode and real clock time when working with 29.97 or 59.94 fps media. For a one-hour program, non-drop frame timecode will be approximately 3.6 seconds ahead of actual elapsed time, which can cause significant synchronization problems in broadcast environments where programs must start and end at precise scheduled times. Using drop frame timecode compensates for this drift and keeps your captions aligned with the real-time broadcast schedule. If you are delivering captions for NTSC broadcast, enabling drop frame is typically required by delivery specifications.
The incode offset affects how timecodes are displayed throughout the application but does not change the underlying frame-accurate timing of your Events. When you set an incode value, all timecode displays add this offset to the internal timing values, ensuring that displayed timecodes match your source media's burnt-in timecode or reference timecode. This is essential for workflows that involve client review, since clients will typically reference timecodes they see on-screen rather than zero-based timecode values. Setting the correct incode prevents confusion and streamlines the review and revision process.
Export format compatibility is another important consideration when configuring frame rate settings. Different subtitle and caption file formats have specific frame rate requirements or expectations based on their target platforms and broadcast standards. SCC and MCC files, which are standard delivery formats for broadcast closed captions in North America, typically require 29.97 fps with drop frame enabled. EBU STL files used for European broadcast delivery typically require 25 fps. When you configure your project with the correct frame rate from the beginning, you ensure compatibility with your target export formats and avoid potential conversion issues during final delivery.
Reading speed calculations and quality control validation are also affected by frame rate changes. When you modify the frame rate setting using the Project Timing Settings modal, the application recalculates all Event timings by rounding to the nearest valid frame boundary. This recalculation can cause slight shifts in Event duration, which in turn affects reading speed measurements reported in words per minute or characters per second. If your project has Events that are already close to reading speed thresholds defined in your quality control settings, changing the frame rate could cause some Events to fail validation that previously passed, or vice versa. It is important to re-run quality control checks after making frame rate changes to ensure all Events still meet your delivery specifications.
Troubleshooting
If the timecodes displayed in Closed Caption Creator do not match the burnt-in timecode (BITC) visible on your video, verify that your project incode is configured correctly. Open the Project Timing Settings modal and compare the incode value to the timecode shown on the first frame of your video. If they do not match, update the incode field to reflect the starting timecode of your media and click Update Settings. All timecode displays throughout the application will immediately reflect the new offset.
When working with 29.97 fps or 59.94 fps content, caption timing may appear to drift over the course of long-form programs if drop frame is not enabled. This drift manifests as captions gradually appearing earlier or later relative to the corresponding dialogue as the program progresses. If you observe this behavior, open the Project Timing Settings modal and enable the drop frame checkbox. The application will convert all timecodes to drop frame notation and eliminate the drift between timecode and real clock time.
If you attempt to change the frame rate in the Project Timing Settings modal but the setting does not appear to take effect, verify that your project is not locked to a specific export format that requires a particular frame rate. Some export presets and format specifications enforce frame rate requirements, and changing the project frame rate may conflict with these constraints. Review your export settings and adjust them as needed to allow frame rate flexibility, or create your project with the required frame rate from the beginning.
When auto-detection prompts do not appear during media import, confirm that you are using the desktop version of Closed Caption Creator and importing local media files from your hard drive. Auto-detection requires direct access to video file metadata through FFmpeg, which is only available when working with local files. Cloud storage URLs, streaming manifests, and embedded platform media do not support metadata extraction and will not trigger auto-detection prompts. In these cases, you must manually configure frame rate and incode settings using the Project Timing Settings modal.
If Events appear to shift slightly after changing frame rate settings, this is expected behavior caused by the frame boundary rounding that occurs during timecode recalculation. When you change from one frame rate to another, each Event's start and end time is rounded to the nearest valid frame for the new rate. This rounding can cause small shifts in Event positioning, typically measured in fractions of a second. Review your Event timing on the timeline after frame rate changes and make manual adjustments if needed to restore precise positioning.
Related Pages
- Converting Frame Rates
- Timing and Synchronization
- Automatic Sync
- Create Your First Project
- Media Import
- Quality Control (QC) Review
- Subtitle Export
Source notes
- Components:
src/components/modals/MediaImport.svelte,src/components/modals/ProjectTimingSettings.svelte,src/components/editor/events/inputs/TcInput.svelte - Libraries:
src/external/cc-lib/lib/timecode.js,src/external/cc-lib/dict/frameRates.js - Related functions: Auto-detection logic, timecode conversion and validation, frame rounding algorithms