Manual Sync (Caption Spotting)
Manual sync, also known as caption spotting or cueing, is the process of assigning precise start and end timecodes to each caption Event in your project. This ensures that captions appear on screen at exactly the right moment to match the corresponding dialogue or audio, creating a synchronized viewing experience for your audience. Manual spotting provides complete creative control over caption timing and is an essential skill for professional captioners working across all types of media content.
Understanding Caption Synchronization
Caption synchronization, often called timing or spotting, refers to the assignment of temporal boundaries to text Events so they display in sync with the spoken dialogue, sound effects, or other audio elements in your video. Every caption Event requires two timecode values: a start time that determines when the caption first appears on screen, and an end time that determines when the caption disappears. The relationship between these timecodes and the audio they represent defines the quality and accuracy of your caption timing.
Proper synchronization is critical for accessibility and viewer comprehension. Captions that appear too early can spoil upcoming dialogue or confuse viewers about who is speaking. Captions that appear too late cause viewers to miss important information or struggle to connect the text with the corresponding audio. Precisely timed captions enhance the viewing experience by maintaining natural reading flow and preserving the pacing and rhythm of the original content.
The synchronization process is typically one of the final steps in the captioning workflow, performed after the text content has been transcribed, formatted, and edited for accuracy and readability. At this stage, you are focusing purely on the temporal placement of already-written captions rather than simultaneously managing transcription, formatting, and timing. This separation of concerns allows you to concentrate fully on achieving frame-accurate timing without the cognitive load of multiple simultaneous tasks.
Manual Sync vs Automatic Sync
Closed Caption Creator offers two primary approaches to caption synchronization: manual spotting and automatic sync. Understanding when to use each method helps you work efficiently while maintaining quality standards appropriate to your delivery requirements and workflow constraints.
Manual spotting provides complete control over every timing decision and is the traditional approach used by professional captioners for broadcast-quality work. When you manually spot captions, you make individual decisions about when each Event should appear and disappear based on your judgment of the audio pacing, on-screen action, shot changes, and reading speed requirements. This level of control is essential for complex content with overlapping dialogue, rapid speaker changes, dense technical terminology, or creative timing requirements that must match specific editorial decisions.
Manual spotting is particularly valuable when working with content that includes music, sound effects, or non-speech audio that requires careful timing decisions. It allows you to time captions to appear during natural pauses in dialogue, align captions with shot changes or visual cuts to maintain viewer focus, and adjust timing to ensure adequate reading time while respecting the natural flow of the content. Professional broadcast delivery often requires manual spotting to meet stringent timing accuracy standards and to accommodate the nuanced timing decisions that distinguish high-quality professional captions from automated alternatives.
Automatic Sync uses speech recognition and alignment algorithms to analyze your audio and automatically assign timecodes to Events based on the detected speech patterns. This approach is significantly faster than manual spotting and is ideal for projects with tight deadlines, large volumes of content, or workflows where approximate timing is acceptable. Automatic sync works best with clear audio, single-speaker content, and situations where caption timing can be based primarily on word or phrase boundaries without complex creative considerations.
Many professional workflows combine both approaches, using automatic sync to generate initial timing as a starting point and then refining specific sections manually where precision is critical or where the automatic timing produced unsatisfactory results. This hybrid approach balances efficiency with quality, allowing you to leverage automation for the bulk of the work while applying manual expertise where it matters most.
Using the Timing & Sync Panel
The Timing & Sync Panel provides a dedicated interface for manual caption spotting that streamlines the process and allows you to work quickly and efficiently. This live timing tool is designed to support continuous playback spotting, where you watch your video from beginning to end and mark Event boundaries in real time as the dialogue occurs. This approach mirrors traditional caption spotting workflows used in broadcast production environments.
The Timing & Sync Panel is located in the Quick Tools drawer beneath the media player. To access it, click the Quick Tools icon or panel to expand the drawer if it is not already visible, then select the Timing & Sync tab from the available quick tool options. The panel will display the spotting controls and Event preview areas that you will use during the synchronization process.
Before beginning the manual spotting process, verify that your Event Group contains all the text content you need to time. If you have not yet created your caption text, you will need to complete the transcription and formatting steps first. Manual spotting assumes that your Events already contain the text content and that you are focusing solely on assigning timecodes. You should see a list of Events in your Event List, with start and end times either unset or showing placeholder values of 00:00:00:00 or similar defaults.
To prepare for spotting, navigate to the beginning of your video using the media player controls and select the first Event in your Event Group by clicking on it in the Event List. The selected Event will be highlighted, and its content will appear in the Event editor. This first Event is the one you will spot first when you begin marking timecodes.
Before you start playing your video and spotting Events, verify that all video lock options located beneath the media player are disabled. Video lock features such as caption lock or video lock can interfere with the Timing & Sync Panel's behavior by preventing natural playback or creating navigation conflicts. Disabling these locks ensures that the video plays continuously while you spot captions and that the panel controls function as expected. The panel is ready to use immediately once you have selected an Event and are viewing the Timing & Sync tab.
Understanding the Timing & Sync Interface
The Timing & Sync Panel offers two different timing modes that you can select based on your preferred workflow style. You can configure the timing mode by clicking the settings button (three dots icon) in the top right corner of the panel to open the Timing & Sync Settings modal.
In Long Press mode, the panel displays a single text box showing your currently selected Event and one Show Event button. This mode is designed for single-handed operation where you press and hold the button or keyboard shortcut to mark both the start and end times of an Event. When you press down, the start time is set, and when you release, the end time is set and the selection automatically advances to the next Event. This mode is efficient for continuous dialogue where Events follow one after another with minimal gaps.
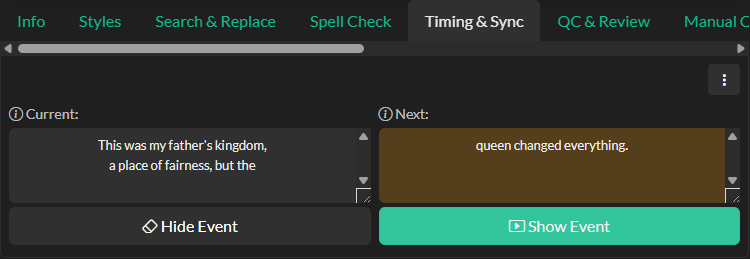
In Dual Key mode, the panel displays two text boxes and two separate buttons for more granular control over timing. The text box on the left displays the Current Event, which represents the Event that is currently being shown on screen and actively having its end time updated as the video plays. The text box on the right displays the Next Event, which shows your currently selected Event that you are about to time next. This Event's start time will be set when you click the Show Event button. Below these preview areas, you will find both a Hide Event button and a Show Event button, giving you independent control over hiding the current Event and showing the next Event.
The relationship between these displays creates a continuous workflow where you are always looking ahead to the next Event to spot while simultaneously monitoring the Event currently on screen. This dual awareness helps you make timing decisions that account for both the immediate caption and the transition to the following caption. The choice between Long Press and Dual Key modes depends on your personal preference and the nature of the content you are timing.
Spotting Workflow and Controls
Once you have prepared your project and selected your Event, you are ready to begin the actual spotting process. Click the play button on the media player to start video playback. As the video plays, you will listen to the dialogue and watch for the moment when each caption should appear on screen.
In Long Press mode, you use a single button for the entire spotting workflow. When you press down on the Show Event button or hold down your assigned keyboard shortcut, the start time of your currently selected Event is set to the current playhead position. While you continue holding the button or key, the end time continuously updates to match the playhead as the video plays. When you release the button or key, the end time is finalized at that moment, and the selection automatically advances to the next Event. This creates a rhythm where you press and hold for the duration of each caption, releasing when the dialogue ends and immediately pressing again when the next caption should begin.
In Dual Key mode, you have two separate controls that provide more granular timing decisions. The Show Event button sets the start time of your currently selected Event and begins displaying it on screen. Once shown, the Event becomes the active Current Event and its end time continuously updates as the video plays. The Hide Event button allows you to explicitly set the end time of the Current Event and remove it from screen, clearing the active Event state. After showing an Event, clicking Show Event again will set the end time of the previous Event to just before the new Event starts, then show the new Event and advance your selection to the next Event in line.
For the majority of your spotting session in Dual Key mode, you will primarily use the Show Event button. Each time you hear new dialogue begin, you click Show Event to mark the start of the corresponding caption and automatically transition to preparing for the next Event. This creates a flowing work pattern where you are clicking in rhythm with the dialogue changes, marking caption boundaries as they occur naturally in the audio.
The end time of each Event is continuously updated as long as that Event remains the active Current Event. This means that once you show an Event, its end time automatically extends to match the current playhead position until you either show the next Event or explicitly hide the current Event. This behavior ensures that captions remain on screen covering the full duration of the related dialogue without requiring you to manually mark both start and end points separately for continuous dialogue.
The Hide Event button in Dual Key mode serves a specialized purpose for creating gaps between Events. In situations where there is a pause in dialogue, a transition between scenes, or a moment where no caption should be visible on screen, you click Hide Event to explicitly set the end time of the current Event and clear the on-screen display, creating a gap before the next Event begins. This distinguishes between continuous dialogue where one caption immediately follows another and segmented content where intentional gaps exist between caption displays.
Undernfiguring Timing & Sync Settings
The Timing & Sync Panel includes a settings modal that allows you to customize the spotting workflow to match your preferences and working style. Access this modal by clicking the three dots icon button in the top right corner of the Timing & Sync Panel. The settings modal provides several important configuration options that affect how the panel behaves during spotting.
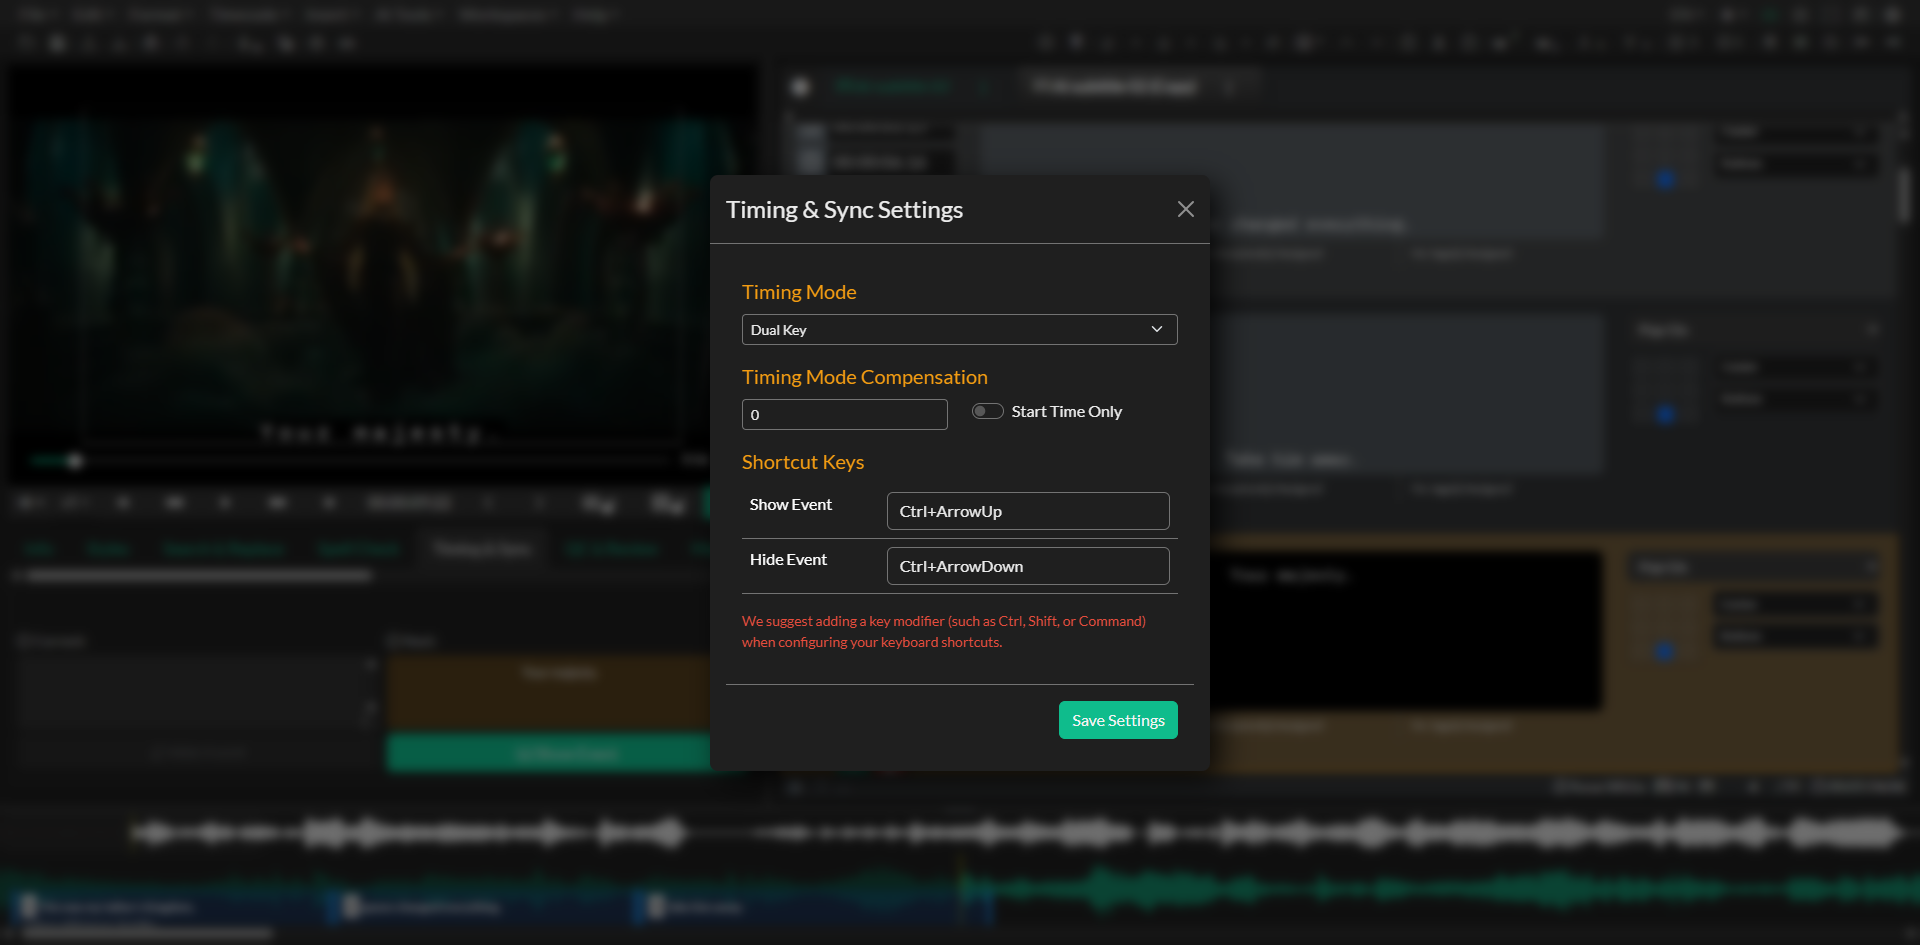
The Timing Mode setting allows you to choose between Long Press mode and Dual Key mode, as described in the previous section. Select the mode that best matches your preferred spotting workflow and the nature of the content you are timing. You can change this setting at any time, although it is generally best to establish your preferred mode at the beginning of a project and maintain consistency throughout.
The Compensation setting allows you to specify a frame offset that will be applied when setting Event timecodes. This compensation is measured in frames and can be used to account for reaction time delay or other systematic timing offsets in your spotting workflow. For example, if you find that you consistently click slightly late due to reaction time, you can set a negative compensation value to automatically shift your spotted timecodes earlier by the specified number of frames. This frame-based compensation respects your project frame rate and ensures frame-accurate timing adjustments.
The Start Time Only checkbox provides an option to apply the compensation value only to Event start times rather than both start and end times. This can be useful if your reaction time affects when you mark caption beginnings but not when you mark caption endings, or if you have different timing tendencies for in points versus out points.
TheUsing Keyboard Shortcuts for Spotting
While the Timing & Sync Panel provides on-screen buttons for the Show Event and Hide Event functions, many professional captioners prefer to use keyboard shortcuts for spotting to improve speed and reduce the need to move between the keyboard and mouse during the spotting process. Keyboard shortcuts allow you to keep your hands in a comfortable position and mark timings with quick key presses rather than mouse clicks.
The keyboard shortcuts you configure in the Timing & Sync Settings modal are active whenever the media player is playing and no other modal dialog is open. In Long Press mode, you press and hold your Show Event shortcut key to set the start time and keep holding while the Event remains on screen, then release to set the end time and advance to the next Event. In Dual Key mode, you press the Show Event shortcut to show each new Event and press the Hide Event shortcut to explicitly hide the current Event when creating gaps.
Configuring effective keyboard shortcuts for spotting can significantly improve your timing accuracy and efficiency. By eliminating the need to visually locate and click on-screen buttons, you can maintain continuous focus on the media player and the audio while marking timings purely by feel and rhythm. This concentration on the content rather than the interface often results in more natural and accurate timing decisions that better match the flow and pacing of the dialogue.
As you develop your spotting skills, experiment with different keyboard shortcut configurations to find the arrangement that feels most comfortable and efficient for your workflow. Some captioners prefer shortcuts that can all be accessed with one hand, leaving the other hand free for media player controls or note-taking. Others prefer shortcuts spread across different keyboard areas to avoid accidental key presses. The flexibility of customizable shortcuts allows you to adapt the tool to your individual working style. When choosing shortcuts, consider using easily accessible keys such as those on the numeric keypad or function keys that do not conflict with other important application functionsingle-letter keys that do not conflict with other application functions.
Configuring effective keyboard shortcuts for spotting can significantly improve your timing accuracy and efficiency. By eliminating the need to visually locate and click on-screen buttons, you can maintain continuous focus on the media player and the audio while marking timings purely by feel and rhythm. This concentration on the content rather than the interface often results in more natural and accurate timing decisions that better match the flow and pacing of the dialogue.
As you develop your spotting skills, experiment with different keyboard shortcut configurations to find the arrangement that feels most comfortable and efficient for your workflow. Some captioners prefer shortcuts that can all be accessed with one hand, leaving the other hand free for media player controls or note-taking. Others prefer shortcuts spread across different keyboard areas to avoid accidental key presses. The flexibility of customizable shortcuts allows you to adapt the tool to your individual working style.
Best Practices for Manual Spotting
Effective manual caption spotting combines technical precision with creative judgment and benefits from consistent application of best practices developed through professional captioning experience. These practices help you achieve high-quality timing that enhances accessibility and viewer comprehension.
Plan for adequate reading time when spotting caption Events. Each caption must remain on screen long enough for viewers to read and comprehend the text at a comfortable pace. Industry guidelines typically recommend a minimum reading speed of 160 to 180 words per minute for adult viewers, with slower speeds appropriate for children's content or audiences with lower reading levels. The Event properties and quality control tools in Closed Caption Creator can help you monitor reading speeds and identify Events that may be displayed too briefly for comfortable reading.
Consider shot changes and visual edits when making timing decisions. Captions that change at the same moment as a visual cut or scene transition can be disorienting to viewers because they must simultaneously process new visual information and new caption text. When possible, time caption changes to occur slightly before or after significant visual edits, giving viewers time to adjust to the new visual context before reading new caption content. This technique, sometimes called anticipatory timing or delayed timing, helps maintain viewer focus and reduces cognitive load.
Respect natural speech patterns and pausing when spotting dialogue. Captions should generally appear at the beginning of natural speech phrases or sentences rather than in the middle of verbal clauses. Similarly, captions should typically end at natural pause points in speech rather than cutting off mid-phrase. This synchronization with speech rhythm helps captions feel integrated with the audio and makes them easier to process as supplementary information rather than distracting interruptions.
Maintain consistency in your timing decisions throughout a project. If you establish a particular timing style for one section of content, such as allowing captions to linger briefly after speech ends or transitioning immediately to the next caption, maintaining that same timing approach throughout the project creates a coherent and professional result. Inconsistent timing can be jarring to viewers and may suggest varying quality or attention to detail.
Review your timing after completing the initial spotting pass. While the Timing & Sync Panel is designed for efficient real-time spotting, it is valuable to play through your completed project at least once to verify timing accuracy and make adjustments where needed. During this review pass, you can identify Events that need slight timing adjustments, gaps that should be closed or created, and synchronization issues that may have been introduced during the fast-paced spotting process. This review step distinguishes professional deliverables from rough first-pass timing.
Combining Manual and Automatic Approaches
Many professional workflows benefit from combining manual spotting techniques with automatic synchronization tools to balance efficiency and quality. Understanding when and how to use each approach allows you to optimize your workflow for different project requirements and delivery standards.
You might use Automatic Sync to generate initial timing for the majority of your Events, then manually refine specific sections where the automatic timing is unsatisfactory or where creative timing decisions are required. This hybrid approach allows you to leverage the speed of automatic synchronization while applying manual expertise to the sections that matter most for quality or that present challenges for automatic algorithms.
Alternatively, you might manually spot key sections such as complex multi-speaker dialogue, rapid exchanges, or sections with important timing requirements, and use automatic sync to fill in simpler sections with single-speaker narration or straightforward dialogue. This selective manual approach focuses your time and expertise on the content that benefits most from human judgment while automating routine timing tasks.
The combination of manual and automatic techniques provides flexibility to adapt your workflow to project requirements, deadline constraints, and quality expectations, ensuring that you can deliver professional results efficiently across a range of captioning scenarios.
Troubleshooting
Confirm that you have at least one Event selected in your Event Group, as the panel requires a valid selection to determine which Event to time next. Verify that the media player is playing, as the panel's keyboard shortcuts and some functionality require active playback. Check the browser console for any error messages that might indicate technical issues preventing the panel from functioning correctly.
When Events do not appear on the timeline as you spot them, check that you are viewing the correct Event Group and that the timeline is displaying the same Event Group you are timing. Closed Caption Creator supports multiple Event Groups within a single project, and the Timing & Sync Panel will operate on the currently selected Event Group. Ensure that your Event Group selection matches between the Event List and the timeline display.
If video lock conflicts prevent smooth playback during spotting, disable the caption lock and video lock options located beneath the media player before beginning your spotting session. Lock features can interfere with the continuous playback required for effective real-time spotting. The media player should play freely without jumping to match caption positions or responding to other navigation inputs while you are using the Timing & Sync Panel.
When the Hide Event button remains disabled in Dual Key mode, this indicates that there is no active Current Event being displayed. The Hide Event button only becomes enabled after you have shown an Event and that Event is actively on screen. If you need to create a gap between Events, first show an Event to make it active, then use Hide Event to explicitly remove it from the screen before the next Event begins.
If you need to correct a timing mistake after advancing past an Event, pause the video and manually adjust the Event's timecodes using the timecode input fields in the Event editor. You can also use the standard undo function to revert recent timing changes if you spot an error immediately after making it. While there is no automatic "redo last Event" function in the panel, these manual correction approaches allow you to fix timing errors without restarting your entire spotting session.
When keyboard shortcuts for spotting functions do not work as expected, verify that you have properly configured the shortcuts in the Timing & Sync Settings modal accessible from the panel's settings button. Ensure that the shortcuts you assigned do not conflict with other application functions, system-level shortcuts, or browser shortcuts. Test your shortcut configuration before beginning a long spotting session to ensure all controls respond correctly. Remember that keyboard shortcuts only function while the media is playing and no modal dialogs are open.
If you accidentally advance too far through your Events and need to go back several Events, pause the video and manually select the Event where you want to resume spotting in the Event List. Once you select the correct Event and resume playback, the panel will continue normal operation from that point, allowing you to recover from navigation errors without restarting your entire spotting sessionrors without restarting your entire spotting session.
When keyboard shortcuts for spotting functions do not work as expected, verify that you have properly configured the shortcuts in the Keyboard Shortcuts window under the Edit menu and that the shortcuts you assigned do not conflict with other application functions or system-level shortcuts. Test your shortcut configuration before beginning a long spotting session to ensure all controls respond correctly.