Timecode Offset (Rippling)
Timecode offset, also known as rippling, is a powerful timing adjustment tool that shifts selected Events forward or backward in time by a specified amount. This feature is essential when your source media timing changes after you have already created and timed your captions, allowing you to quickly realign all affected Events without manually adjusting each one individually.
When to Use Timecode Offset
Timecode offset becomes necessary when you receive a revised version of your video that differs in length or timing from the version you originally used to create your captions. These changes typically occur when material is added to or removed from the beginning or middle of the program during the editorial process.
Common scenarios that require timecode offset include the addition or removal of slate frames at the beginning of a program. Production slates containing technical information, color bars, or countdown leaders are often present in initial review copies but removed from final broadcast masters, or vice versa. When this happens, all of your caption timecodes will be offset by the duration of the added or removed slate material.
Another frequent use case involves the insertion or removal of commercial black segments in broadcast programming. Network deliverables often require specific lengths of black video inserted at designated commercial break points. If these segments are added after you have completed caption timing, or if they are removed from a version that originally included them, your caption Events will no longer align with the corresponding dialogue and will need to be shifted to compensate for the timing change.
Editorial revisions in the middle of a program can also necessitate timecode offset. If a scene is trimmed, extended, or replaced during post-production, all captions following that edit point will be out of sync with the revised video. Using timecode offset allows you to select all Events after the change point and shift them by the exact duration of the edit, restoring proper synchronization without recreating the entire caption file.
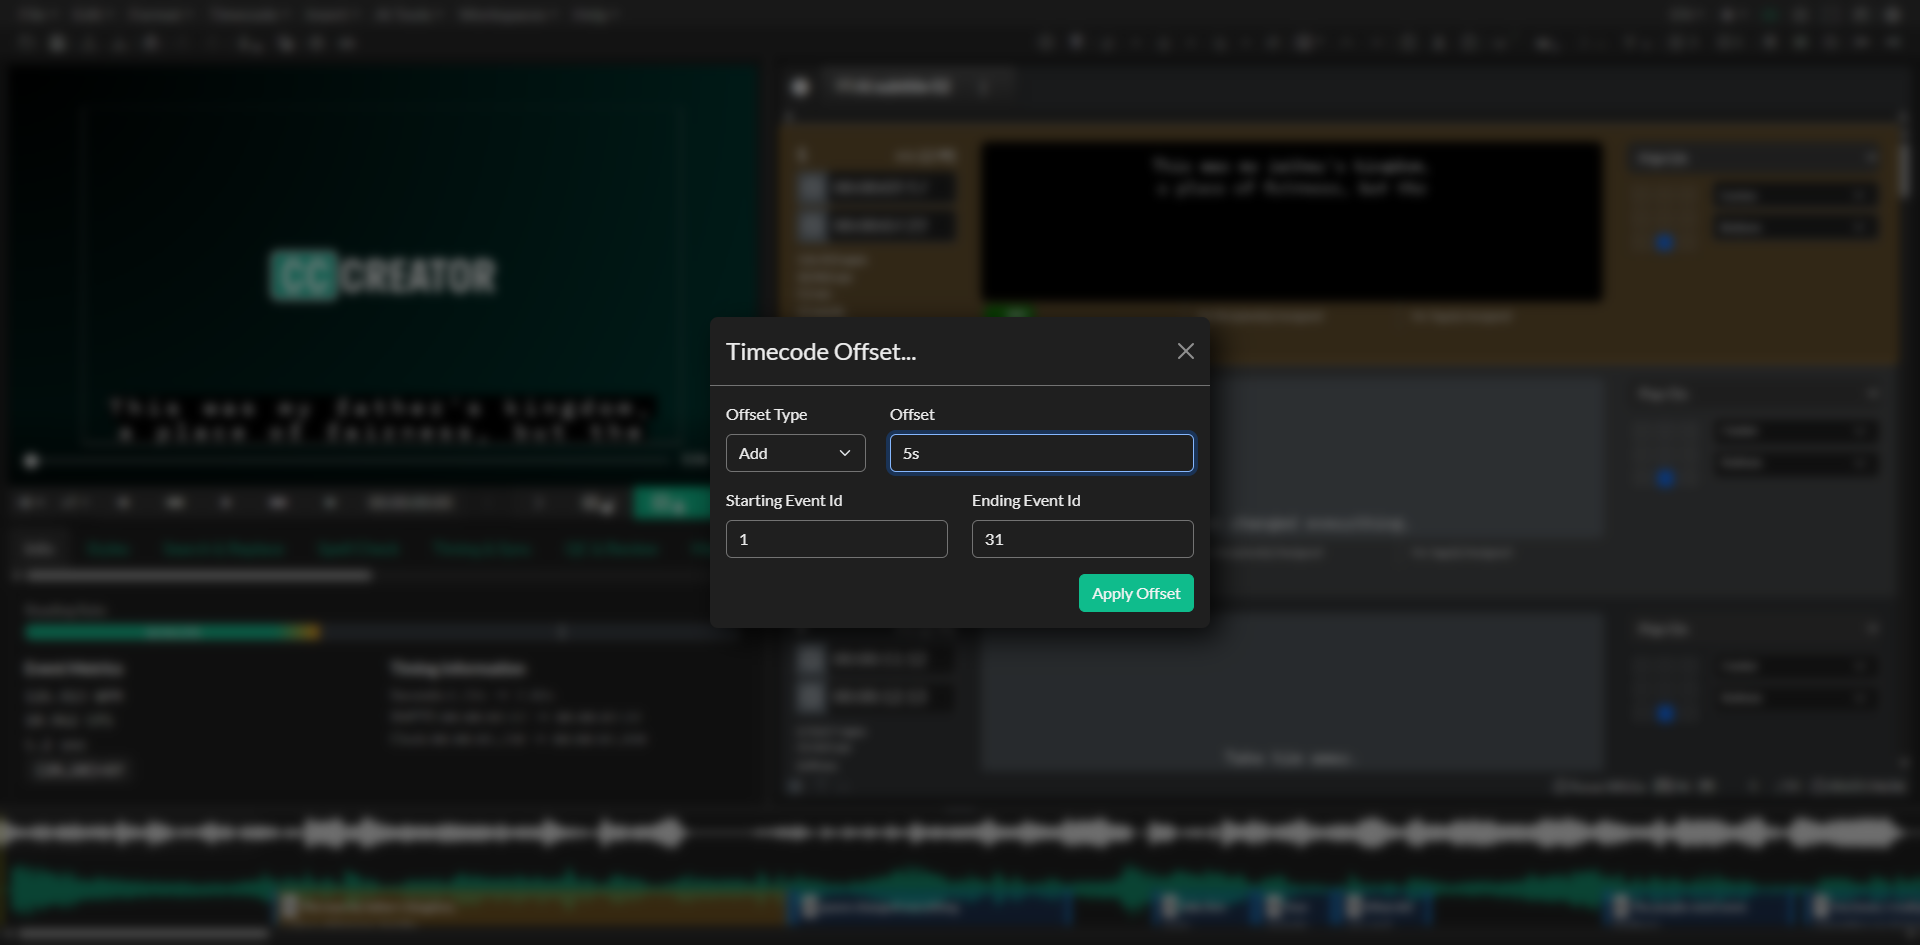
Using the Timecode Offset Tool
The timecode offset workflow in Closed Caption Creator is designed to be intuitive and efficient, minimizing the time required to respond to editorial changes. The tool automatically calculates the offset amount based on your Event selection and playhead position, eliminating manual calculation and reducing the risk of errors.
To begin using timecode offset, first identify the Event that should be moved to a new timecode position. This is typically the first Event that appears after the timing change in your revised media. Select this Event by clicking on it in the Event List. The Event will be highlighted to indicate it is selected, and you can verify the selection by checking that the Event editor displays the content of the selected Event.
Next, play your revised video and navigate to the exact point where you want the selected Event to begin. Use the media player controls to locate the frame where the dialogue or action corresponding to your selected Event now occurs in the revised video. You can use frame-by-frame navigation with the arrow keys or keyboard shortcuts to position the playhead with frame-accurate precision. Pause the video when you have positioned the playhead at the desired new start time for your Event.
With your Event selected and the playhead positioned at the target timecode, navigate to the Timecode menu in the application menu bar and select TC Offset. This will open the Timecode Offset modal dialog, which displays all the settings and calculations needed to perform the offset operation.
The Timecode Offset tool automatically pre-populates all settings based on your current selection and playhead position. The modal displays the current timecode of your first selected Event, the timecode of the playhead position, and the calculated offset amount that represents the difference between these two values. This offset amount shows how much your Events will be moved and in which direction. A positive offset value indicates that Events will move forward in time, meaning their timecodes will increase. A negative offset value indicates that Events will move backward in time, meaning their timecodes will decrease.
For example, if your selected Event currently starts at 01:00:10:00 and your playhead is positioned at 01:00:20:00, the tool will calculate an offset of positive 10 seconds. This tells you that all selected Events will be moved forward by 10 seconds when you apply the offset. Conversely, if the playhead is positioned earlier than the current Event start time, the offset will be negative, moving Events backward.
The Timecode Offset tool provides options for controlling which Events are affected by the offset operation. By default, the tool will offset all Events from the first selected Event through the end of the Event Group, effectively rippling the change through all subsequent Events. This behavior is appropriate for most scenarios where editorial changes affect timing from a specific point forward. However, you can also choose to offset only the currently selected Events if you need more precise control over which Events are moved.
Review the calculated offset amount and the range of Events that will be affected to ensure the operation will produce the desired result. The modal displays a summary showing how many Events will be moved and by how much. This gives you an opportunity to verify that you have selected the correct starting Event and positioned the playhead accurately before committing to the change.
When you are satisfied that the offset settings are correct, click the Apply Offset button to execute the operation. The application will immediately shift all affected Events by the calculated offset amount, updating both their start and end timecodes. The offset operation is added to the undo and redo history, allowing you to revert the change if needed.
After applying the offset, review your Events on the timeline and in the Event List to verify that the timing adjustment has produced the expected result. Play through the affected section of your video to confirm that captions now appear in sync with the dialogue and action. If the offset amount was not quite correct, you can use the undo function to revert the change, reposition the playhead more precisely, and apply the offset operation again with updated settings.
Understanding Ripple Behavior
The term rippling refers to the way the offset operation propagates through your Event Group, moving multiple Events together by the same amount. This ripple effect maintains the relative timing between Events even as their absolute timecodes change. If two Events were originally spaced 5 seconds apart, they will still be spaced 5 seconds apart after the offset operation, but both will have shifted to new timecode positions.
This ripple behavior is essential for maintaining caption synchronization when source media changes affect a specific segment of your program. Without rippling, you would need to manually adjust each individual Event after the change point, which would be time-consuming and prone to errors. The timecode offset tool automates this process by calculating and applying the same time shift to all affected Events in a single operation.
When applying timecode offset to a range of Events, it is important to ensure that the offset operation does not create timing conflicts such as negative timecodes or overlapping Events. The application will validate the offset operation before applying it and will warn you if the calculated offset would move Events to invalid timecode positions. If this occurs, you may need to adjust your Event selection or use a different approach to resolve the timing conflict, such as manually adjusting specific Events or splitting the offset operation into multiple steps.
Combining Timecode Offset with Other Timing Tools
Timecode offset works well in combination with other timing adjustment features available in Closed Caption Creator. After using timecode offset to realign the bulk of your Events following an editorial change, you may need to use additional tools to fine-tune specific sections or address localized timing issues.
If your revised media includes not only added or removed material but also different pacing or different edit points, you may need to use the automatic sync feature to re-time specific segments after applying the initial offset. The combination of timecode offset for broad adjustments and automatic sync for precise realignment provides a comprehensive solution for adapting captions to revised media.
Similarly, if the offset operation results in minor timing inconsistencies due to frame rounding or if some Events need individual adjustment after the bulk move, you can use manual spotting techniques or the stretch and shrink tools to refine the timing without undoing the overall offset operation.
Troubleshooting
If the calculated offset amount shown in the Timecode Offset modal does not match your expectations, verify that you have selected the correct Event and positioned the playhead accurately. The offset calculation is based on the difference between the first selected Event's start time and the current playhead position, so both of these values must be set correctly for the calculation to be accurate. Use frame-by-frame navigation to ensure the playhead is positioned exactly where you want the Event to begin in the revised media.
When the offset operation does not affect all the Events you expected to move, check the Event selection range in the Timecode Offset modal settings. Confirm that you have chosen the appropriate option for rippling through all Events from the selected point forward, rather than only offsetting the currently selected Events. If you need to offset Events across multiple Event Groups, you will need to apply the offset operation separately to each Event Group.
If Events appear to overlap or have invalid timing after applying an offset, this typically indicates that the offset moved Events too far or in the wrong direction. Use the undo function to revert the offset operation, then carefully review your playhead position and Event selection before attempting the offset again. Consider whether the timing change in your media actually represents a simple offset or whether it requires more complex timing adjustments using different tools.
When working with very large offset values that shift Events by several minutes or hours, verify that the resulting timecodes will still fall within valid ranges for your project frame rate and drop frame settings. Extremely large offsets can occasionally produce timecode values that exceed format limitations or create timing edge cases that require manual review and adjustment.
If the Apply Offset button is disabled or grayed out in the Timecode Offset modal, ensure that you have at least one Event selected and that the playhead is positioned at a different timecode than the selected Event's current start time. The offset operation requires a non-zero offset value, so if the playhead is already positioned at the Event's start time, there is no offset to apply.
Related Pages
- Project Frame Rate & Incode
- Timing and Synchronization
- Automatic Sync
- Stretch and Shrink
- Manual Sync (Caption Spotting)
- Converting Frame Rates
Source notes
- Transcript:
docusaurus/transcripts/tc_offset.txt - Legacy guide:
creator-userguide-old.txt(Timecode Offset) - Component:
src/components/modals/TcOffset.svelte