Automatic AD/DV
Automatic AD/DV is an AI-powered pipeline that generates a complete audio description script directly from your video. The system combines automated speech transcription, computer vision-based scene change detection, frame extraction, and a large language model (LLM) to produce a timed AD script that fits within the natural gaps in dialogue. The result is imported into your project as ready-to-edit Event Groups, which you can then assign voices to and render using the built-in Text-to-Speech engine.
This feature requires the desktop version of Closed Caption Creator and an active internet connection. Processing is cloud-based and is billed per minute of video content.
Getting Started
Create a new project and import your video file. Then go to AI Tools > Automatic AD to open the job submission form.
Processing Range
By default, Automatic AD processes the entire video. To limit generation to part of the media, turn off Process Entire Video and enter a segment start and end timecode. The segment fields use the project's frame rate and drop-frame settings, and the end time defaults to the full media duration when the form can detect it.
Segment processing is useful for testing a short section, regenerating part of a program, or managing credit usage on long-form content. The form validates that the segment starts at or after zero, ends after the start time, and does not extend beyond the media duration.
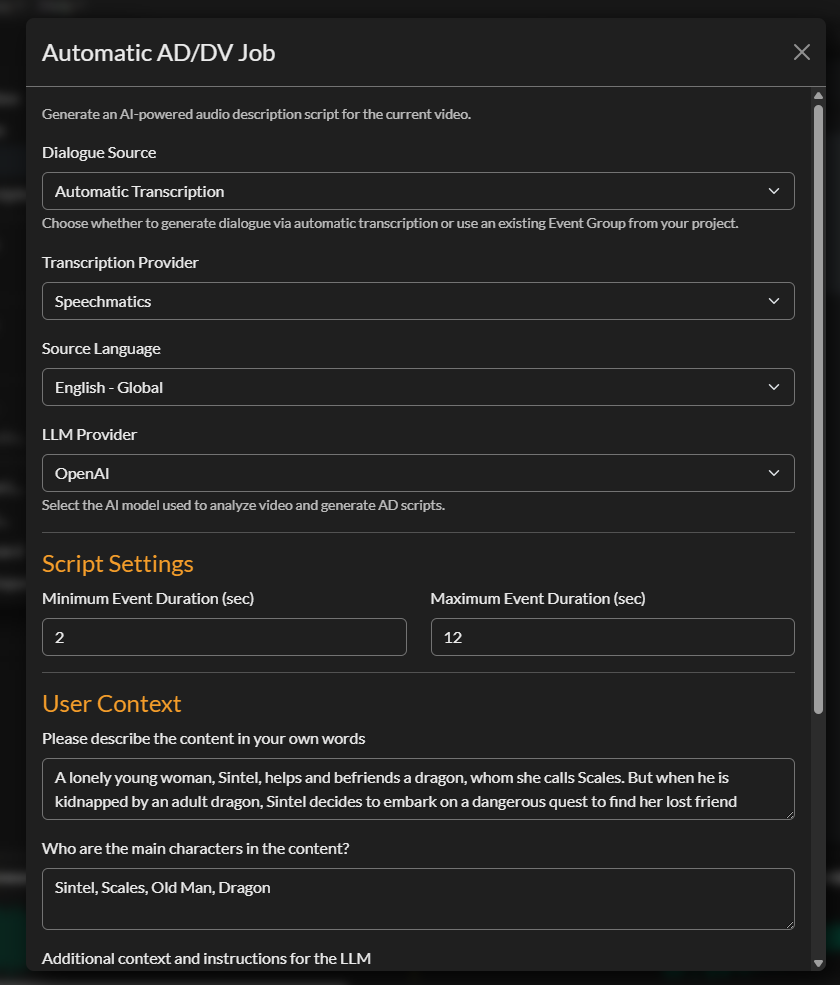
Dialogue Source
The first setting is the Dialogue Source — where the system gets the spoken dialogue it uses to identify gaps for your AD events.
| Option | Description |
|---|---|
| Automatic Transcription | The system transcribes the audio itself using your chosen provider |
| Existing Event Group | Use a caption or transcription Event Group already in your project |
If you already have an accurate caption file imported into your project, selecting it as the dialogue source avoids a redundant transcription step and reduces cost. If no caption file exists, select Automatic Transcription and the system will transcribe the audio as part of the job.
When Automatic Transcription is selected, additional settings appear for Transcription Provider and Language. Supported providers include Speechmatics, Deepgram, and Assembly AI. Your provider and language choices are saved automatically for future sessions.
LLM Provider
Select the large language model service used to generate the AD script. Currently supported: Anthropic (Claude). The LLM is given the dialogue transcript, the list of detected shot changes, and the context you provide below to write scene descriptions that fit naturally between lines of dialogue.
You can also choose a Backup LLM. When configured, the backup model is included in the job configuration so the cloud pipeline can fall back if the primary model is unavailable.
Output Controls
Automatic AD includes several controls that shape the generated script before it is imported back into your project.
Output Language sets the language the LLM should use for generated descriptions. Supported output languages include English, Italian, German, Spanish, Catalan, Czech, French, Portuguese, Japanese, Chinese, Hindi, and Russian.
Description Length controls the target word budget for each description. The available presets are Brief (up to 12 words), Standard (up to 25 words), and Detailed (up to 45 words). Standard is the default.
Avoid Duplicates asks the model to avoid repeating descriptions that are already covered nearby.
Description Focus lets you choose what the model should emphasise, including actions and movements, characters and expressions, setting and environment, shot type, on-screen text and titles, and props and costumes.
Commercial AD enables additional controls for advertising workflows. When enabled, you can enter a disclaimer or instruction text that is sent with the job configuration.
Timing Settings
Minimum Event Duration
The shortest AD event the system will generate, in seconds. Events shorter than this value are discarded as too brief to be spoken clearly. The default is 2 seconds.
Maximum Event Duration
The longest AD event the system will generate, in seconds. This caps the length of any individual description. The default is 12 seconds. Adjusting this down produces shorter, more punchy descriptions; adjusting it up allows the system to write longer, more detailed passages where longer gaps exist in the dialogue.
Maximum Words Per Minute
The Max WPM setting controls the highest reading speed the Automatic AD pipeline may use when fitting generated narration into available gaps. The available presets are 150 WPM, 200 WPM, 250 WPM, and 300 WPM. The selected value is a ceiling, not a target: descriptions that fit comfortably stay at the baseline rate, while tighter events may receive a faster per-event rate.
Context Fields
These fields tell the LLM what your content is about. More detailed context produces more accurate, tonally appropriate descriptions.
Content Description
A one-to-two sentence summary of the programme. Include the genre, setting, and overall tone. For example: "A family drama set in rural Ireland in the 1980s. The tone is understated and melancholic."
Main Characters
A comma-separated list of character names as they should appear in the script. The model uses these names when referring to on-screen people, improving consistency and reducing generic descriptions like "a man" or "a woman."
Additional Instructions
Any further guidance for the LLM about tone, style, or specific requirements. For example: "Follow Netflix audio description guidelines. Describe actions neutrally without interpretation." This field can also be used to exclude certain types of content from description.
Your settings in all three context fields are saved to localStorage and pre-populated the next time you open the form.
Estimated Cost and Submission
The estimated cost is calculated based on video duration. The minimum charge is 3 credits; above the minimum the cost is 1 credit per minute of video. The estimate is shown near the bottom of the form before you submit.
When you are ready, click Submit AD Job. A confirmation dialog displays the estimated cost; confirm to proceed.
After confirming, the application:
- Extracts audio from your video using FFmpeg
- (If using automatic transcription) Uploads the audio for transcription
- Detects scene changes
- Extracts keyframes at 1 fps and deduplicates near-identical frames
- Registers the job in Firestore and uploads all assets to cloud storage
- Hands off to the cloud pipeline, which runs the LLM and assembles the output CCPRJ file
A progress bar and status message show each step as it completes. When submission finishes, the AD Import Dashboard opens automatically.
Monitoring Jobs in the AD Import Dashboard
The AD Import Dashboard is your live view of all submitted AD jobs. It refreshes automatically every 10 seconds. Each row shows the project name, submission date, status, progress percentage, and cost.
You can filter jobs by date range (last 24 hours, week, month, year, or custom) and by status (All, Submitted, Processing, In Progress, Passed, Failed).
Once your job reaches 100 % / Passed, select it in the table to activate the import controls.
You can also access the dashboard at any time via AI Tools > AD Import.
Importing Results
With a completed job selected, click Import to download the output CCPRJ file from cloud storage and add it to your current project. Three new Event Groups are created:
| Event Group | Contents |
|---|---|
| Dialogue | The transcribed (or provided) dialogue, timed to the original audio |
| Shot Changes | One event per detected scene transition |
| AD Script | The generated audio description events, positioned in dialogue gaps |
The project's selected Event Group is automatically updated to the last imported group (the AD Script). Review the events, make any editorial changes, and correct any errors before proceeding to rendering.
Archiving and Deleting Jobs
To keep your dashboard tidy, select a completed job and click Archive to hide it from the default view, or Delete to remove it permanently (including source files from cloud storage). A confirmation dialog is shown before permanent deletion.
You can also export a CSV summary of all visible jobs for reporting purposes using the Export CSV button.
Rendering the AD Script
After importing and reviewing the AD Script Event Group, assign a voice to your events using the Voice Manager (AI Tools > Voice Manager). Then select AI Tools > Render All Audio to synthesise speech for every event in the group. Rendering is processed in batches and may take a few moments depending on the total number of events.
Once rendering is complete, review the audio in the player, adjust timing or wording as needed, and use the ADR Preview panel to check the final mix against the dialogue.