Using the Timeline
The Timeline is the interactive timing panel at the bottom of the main editor window. It displays your events as colored blocks aligned to the video timecode, with optional audio waveform, markers, and support for multiple event groups on separate tracks. Use the Timeline to spot captions, adjust event timing, navigate the project, and compare event groups side by side.
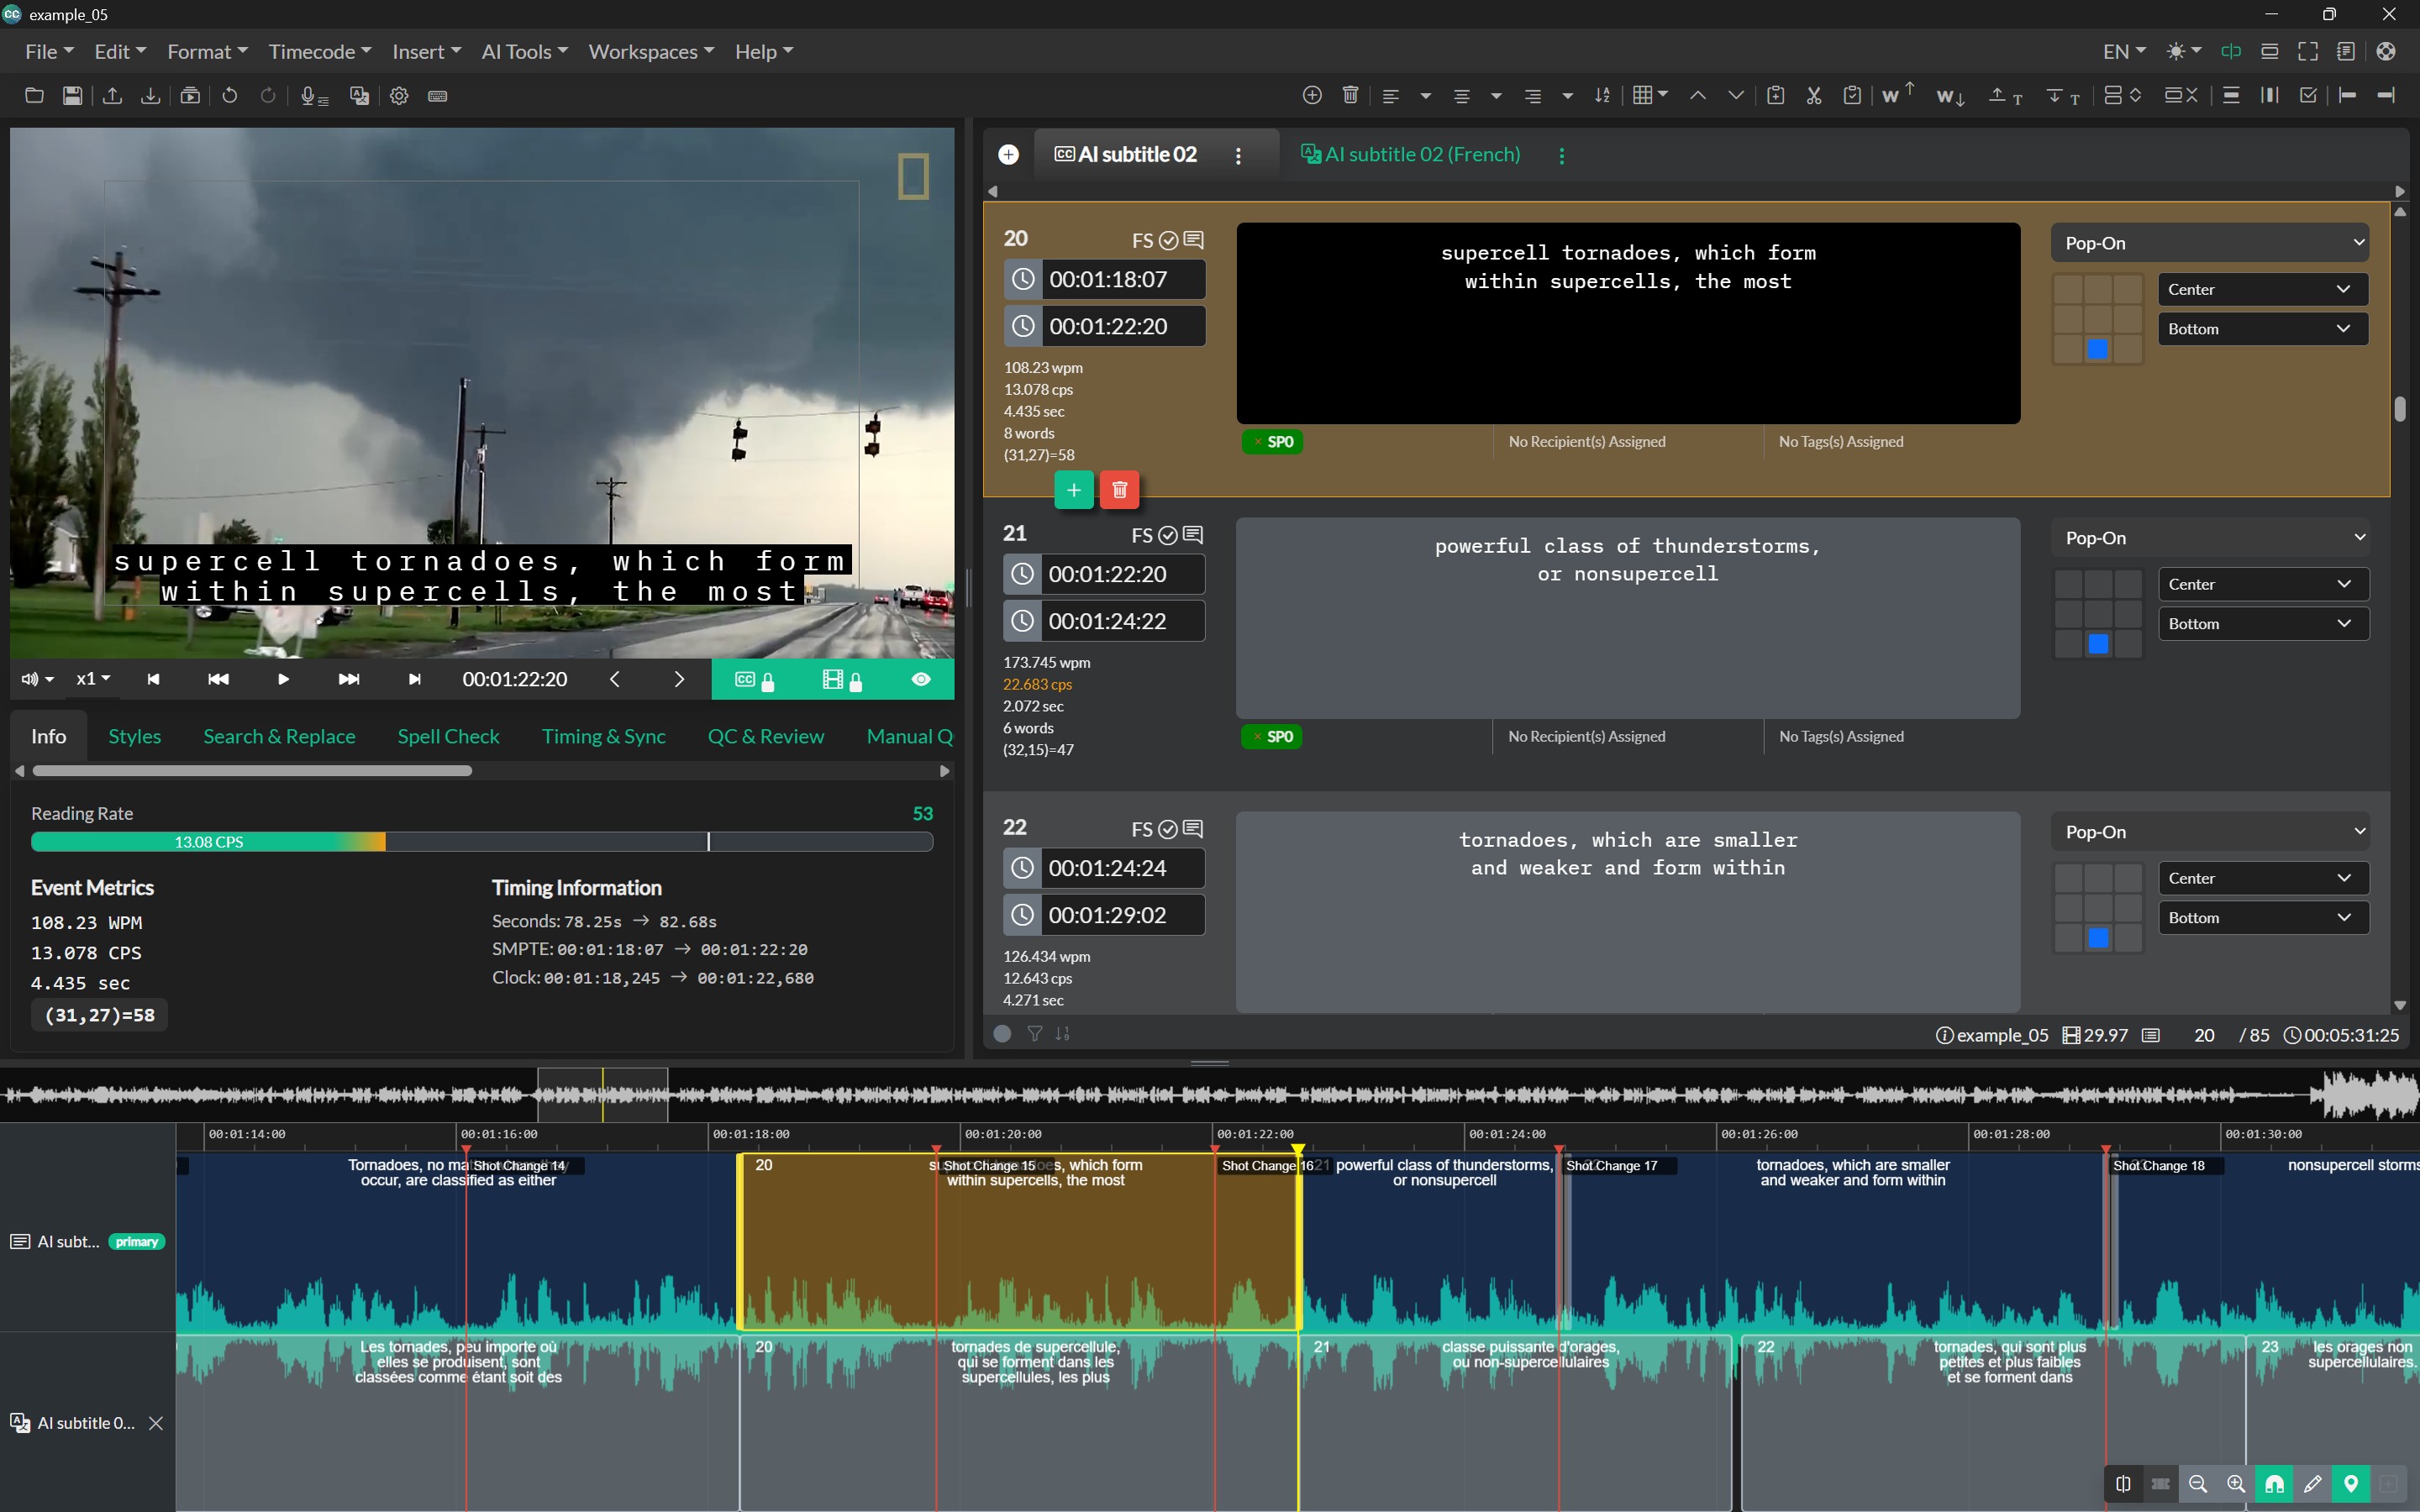
Showing and Resizing the Timeline
The Timeline appears in a resizable pane below the Event List and editor. Drag the splitpane divider between the editor and the Timeline to change its height.
To show or hide the Timeline entirely, click Show/Hide Timeline in the top-right toolbar. Your preference is saved between sessions.
Timeline Layout
The Timeline is organized from top to bottom:
- Minimap — A compact overview of the full program duration. The shaded box shows the portion of the timeline currently visible in the main view. Click anywhere on the minimap to seek the video to that position. Drag the viewport box to pan the main timeline. Hover over the minimap to see a timecode tooltip.
- Track labels — The left gutter lists each event group displayed as a track. The active event group is marked with a primary badge.
- Main timeline — The time ruler, optional marker thumbnail strip, event tracks, marker lines, and the playhead.
On the desktop application with local media loaded, an audio waveform is displayed behind the event tracks. The Timeline remains fully functional without a waveform — events, markers, and the playhead are still available when working with streaming sources or when waveform generation is not available.
Film Strip
On the desktop application with local video media, you can enable a Film Strip row on the Timeline. When an event is selected (and playback is paused), the strip shows video frame thumbnails centered on that event’s start time — frames before the start, the start frame, and frames after. Click a thumbnail to seek the player to that time; double-click to set the selected event’s start to that frame (trimming the previous event’s end if needed to respect the minimum frame gap).
Enable the Film Strip and choose how many frames appear before and after the start under Edit > Options > Editor (Show Film Strip and Film Strip Frames). See Editor Options.
Frames are extracted on demand the first time you select an event and are cached on disk for later reuse. On slower machines, that first generation can feel slow. Use AI Tools > Pre-Render Frame Cache to generate thumbnails for all event starts in the project ahead of time so the Film Strip feels instant while you work. See Pre-Render Frame Cache.
Floating Timeline Toolbar
A toolbar floats at the bottom-right of the Timeline. Each button is described below.
| Button | Label | Description |
|---|---|---|
| Split | Split Event | Splits the event under the playhead at the current time. This is distinct from the editor Split Event command, which splits at the text cursor position in the Event List. |
| Merge | Merge Event | Merges two or more selected events on the timeline into one. Requires at least two events to be selected. |
| Zoom | Zoom Out / Zoom In | Adjusts the horizontal zoom level of the timeline. |
| Snap | Snap to markers and event edges | When enabled, event handles snap to nearby marker positions and to the edges of adjacent events while dragging. |
| Draw | Click-and-drag empty timeline to create events | When enabled, dragging on empty space in the primary track creates a new event spanning the dragged region. Clicking without dragging still seeks the playhead. |
| Markers | Show/Hide Markers | Toggles the visibility of marker lines on the timeline. |
| Refresh | Refresh Timeline | Redraws all event blocks on the timeline without changing your event data. Use this if event labels or blocks appear stacked, duplicated, or “ghosted” after heavy dragging, panning, or zooming. |
| Add track | Add to timeline | Opens a menu listing other event groups in the project. Select a group to display it as an additional read-only track. |
Refreshing the Timeline
In rare cases, the Timeline may show visual artifacts after intensive editing — for example overlapping caption text stacked in the same place, or faint leftover event blocks in gaps where no event exists. These “ghost” regions are a display issue only; your event timing and text in the Event List are unchanged.
Click Refresh Timeline (circular arrow) on the floating Timeline toolbar to clear and redraw all event regions. Zoom level, scroll position, and selection are preserved. If the problem returns, refresh again; if it persists across sessions, contact support with steps to reproduce.
Navigating and Editing on the Timeline
Seeking. Click empty space on a track, the time ruler, or the minimap to move the playhead. Double-click an event to seek to its start time. Drag the playhead head to scrub through the video.
Zooming and panning. With Scroll to Zoom enabled (the default under Edit > Options > Editor), scroll the mouse wheel or trackpad to zoom in or out around the cursor position. Hold Shift and scroll (or use a horizontal scroll gesture) to pan the timeline horizontally. If you turn Scroll to Zoom off — useful with a Magic Mouse or trackpad when accidental touches change the zoom — vertical scrolling pans the timeline instead. You can also drag the time ruler horizontally to pan, and use the Zoom In / Zoom Out toolbar buttons or keyboard shortcuts regardless of this setting.
Selecting events. Click an event on the primary track to select it — the Event List scrolls to the matching row. Hold Ctrl (Windows) or Cmd (Mac) and click to add or remove events from the selection. Hold Shift and click to select a range of events.
Moving and resizing events. Drag an event body to move it in time. Drag the left or right edge handles to adjust the start or end timecode. When Overlap Protection is enabled in Editor Options, events cannot be dragged on top of one another.
Secondary tracks. Event groups added via Add to timeline appear as read-only gray tracks. You can view their events for reference but cannot select, move, or resize them on a secondary track. Remove a secondary track by clicking the × button in the track label gutter (Remove from timeline).
Playback. While the video is playing, the timeline automatically scrolls to keep the playhead visible when it moves past the center of the viewport.
Multi-Track Workflow
To compare two event groups on the timeline — for example, viewing subtitle dialog while editing audio description events:
- Select the event group you want to edit as the primary track (click its tab above the Event List).
- On the Timeline toolbar, open the Add to timeline menu and choose the second event group.
- The selected group appears as an additional track. Your primary group remains editable; the added group is read-only.
- To remove the secondary track, click × in the track label gutter.
Timeline Options
Timeline behavior can be configured under Edit > Options > Editor in the Timeline section. Available settings include:
- Snap to Shot Changes — Snap event handles to detected shot change markers when dragging.
- Click-n-Drag to Create Events — Enable draw-to-create mode on the timeline toolbar.
- Overlap Protection — Prevent events from overlapping when dragged on the timeline.
- Show Marker Comments — Display marker comment text on the timeline.
- Show Marker Thumbnails — Display a thumbnail strip for the selected marker list. Available on the desktop application only.
- Show Film Strip — Display a film strip of video frames around the selected event’s start time. Available on the desktop application with local video only.
- Film Strip Frames — Number of frames to show before and after the selected event start (1–30).
- Scroll to Zoom — Zoom the timeline with the mouse wheel or trackpad scroll (enabled by default). When off, scrolling pans the timeline instead; keyboard zoom shortcuts still work.
- Font Size (px) and Font Color — Control the appearance of event text rendered inside timeline blocks.
See Editor Options for full descriptions of each setting.
Keyboard Shortcuts
The following shortcuts are available in the Timeline group under Edit > Shortcut Keys:
| Shortcut | Description |
|---|---|
| Zoom In | Zoom in on the Timeline |
| Zoom Out | Zoom out on the Timeline |
| Select Previous Event On Timeline | Select the event closest to and before the current playhead position |
| Select Next Event On Timeline | Select the event closest to and after the current playhead position |
These shortcuts are unassigned by default until you configure them in the Shortcut Keys panel.